Friday, October 26, 2012

I Made A Pie!


Granted the easiest pie ever, but a pie no less! My husband was way more excited about seeing this than my quilting.
It is a Graham Wafer pie (we call it Salisbury House pie - but that is probably a very local name), although I didn't actually have any graham wafers and had to use shortbread cookies, but it was still delicious. Basically a custard pie.
Here is a link for a similar recipe that I found on the web - they call it Flapper pie - the instructions say that it takes 6 minutes to make! Wow, who couldn't find the time to make a pie like that?! Mine took about 25 minutes. The recipe is very similar to mine, but I use 3 eggs,  no cinnamon in the crust, and I also don't wait for anything to cool.

Have a great day and thanks for stopping by!❤


Update - yes the pie in the photo is mine, and yes it was delicious! A bit sweet for me and I wouldn't add sugar in the crust next time.

Thursday, October 25, 2012

I Think I Might Be Addicted to FMQ!

I quilted another small practice piece.


This one is 8" x 24", and the fabric is raw silk (from an old dress). These little samples are a great way to use up odd pieces of fabric and batting.

The inspiration for the design is from Diane Gaudynski's work (check out this one of her fabulous quilts from her blog - it is the same size as the orange one I just made - what incredible detail she fits in).


The only part that I marked was the outline of the vase (I drew half the design on a folded piece of paper and then cut it out - so that it would be symmetrical). I lightly traced around the design with a very fine, regular, mechanical pencil (the white pen wouldn't work and the Hera marker didn't work on the silk like it does on cotton).
All the feathers were added free hand, starting with the veins and then filling the rest in. I chose "Bump, Bump" feathers, I find that they are easier to make more flowing and "organic", than traditional feathers.


The main quilting was done with a very light brown 100Wt Invisafil thread, and the background was done with an off-white Invisafil to match the fabric.


Since this is the first time that I used a cone of thread I had to improvise with a cone holder - it worked well.


I added some "Scribbling" around the design,


and a looser background filler as it went further away from the main design.


I tried to keep the background simple so that the feathers and vase would be the focal point.


Here are all the practice pieces that I quilted this past week - 


time to go back to piecing some quilt along blocks. Although I think my husband would like me to bake - when he came home today I wanted to show him what I had made, he thought it would be a pie (is he new here!? I am too busy sewing!).

Have a great day and thanks for stopping by!❤

Wednesday, October 24, 2012

Orange Whole-cloth Quilt

 I have been doing lots of free motion quilting since I took the "Design It, Quilt It" Craftsy class.


This time I wanted to see if I could make a traditional quilt design using tools that I have at home (compass, rulers...).


I used a light table to mark the design. The fabric is a bright Kona Cotton orange (it glows on the light table in the above picture).


I marked the top with a white, iron off pen from Clover. I just measured out where the feathered border was to go, the pressed creases helped with the design layout. Click on the photos to make them bigger.


The thread is a golden/orange coloured 100Wt InvisaFil, with a #80 Microtex needle in the machine.


This piece is about 24" square.


The thread came out as a beige colour in the areas with lots of quilting.
Once again the batting is a layer of cotton and half a layer of wool. Quilted on my domestic sewing machine.

Off to work on another whole-cloth - in the "quilting factory" as my family calls it!

Have a great day and thanks for stopping by!❤

Tuesday, October 23, 2012

October Free Motion Quilting Challenge

I finished up this month's Sew Cal Gal Free Motion Quilting Challenge piece.


The teacher this month is the talented Teri Lucas.

I did my sample on one of the rectangles in my sample quilt (I already did a FMQ sample on satin earlier this week).


I started by drawing out my name,


and then adding some different motifs. I echoed those designs, and then divided up the area to add background fillers.


I used a few different weights of thread for this (50 Wt Aurifil, 100Wt InvisaFil and 30Wt Sulky variegated).

Another fun challenge! Thank-you Teri and SewCalGal.

Have a great day and thanks for stopping by!❤

Block 6 THQA 2012

This week's block is an Ohio Star.


For one 7" block you will need - 


Print A (mine is the orange dots) -

                        4 - 2+7/8" squares (for the corners)
                        2 - 3+3/4" squares (for the Hourglass blocks)

Print B (mine is the brown print) -

                         2 - 3+3/4" squares (for the Easy Hourglass blocks)

Print C (mine is the red print) -

                         1 - 2+7/8" square (for the centre)

My instructions are getting less detailed (please let me know if you would prefer more details, I just assume that it is becoming repetitive over the weeks), but remember to cut accurately, sew scant 1/4" seams......


Start by making the Easy Hourglass blocks (all the instructions can be found here) with the 3+3/4" Print A and Print B squares - matching one square of each together.


This will make 4 Hourglass units, that need to be trimmed to 2+7/8".


All the pieces will be arranged like the above photo, and sewn together like a regular Nine-Patch.


Trim the block to 7+1/2".

My other blocks -


For this one I only cut one Print A 3+3/4" square and I cut a Print D 3+3/4" square.


The Easy Hourglass blocks where made just the same. Starting with a Print A square matched to a Print B, and a Print D matched to a Print B, then matching the opposite half square triangles together like the above photo.


This one I challenged myself to make Easy Hourglass blocks out of striped fabric! The stripes had to go  at 90° to each other for the first half square triangles - once again, probably just me.


All three blocks together. We have past the half way point on the blocks now!

Have a great day and thanks for quilting along!❤

Sunday, October 21, 2012

Quilting Satin

I am still having so much fun free motion quilting things I learned from the Craftsy class. Cindy Needham said that it was addictive and she is so right!


I tried quilting satin this time, and using a stencil for the design. I only have a few stencils that I inherited,


this is the only medallion stencil that I have (I think that it is the first time that I have ever used it). I used Quilt Pounce to mark it (it is the iron off kind).


I used a french curve and an iron off Clover white marking pen to extend the lines on the design. The Clover pen worked amazingly well on the satin, much better than on cotton.


Once I quilted the basic lines I added the 1/2" grid for the detail quilting. You can see how well the white markings show up.


Once again I used one layer of cotton batting and half a layer of wool batting.


The satin was much easier to quilt than I thought that it would be (I inherited this satin too, I assume it is just some polyester lining). It is nice to be able to use things that I have laying around.
I used 100Wt InvisaFil thread for all the quilting.
I think the stencil looks like a poinsettia and would be great for Christmas.


Love the shine of the satin. It is just little - 7+1/2" x 9".


This is the back - Aurifil #50 thread in the bobbin. I used a #80 Titanium needle for the quilting. A single hole throat plate on the machine seems to make all the difference, I think there would have been tension problems with the "scribbling" without it.
It took about 3 hours to make this piece (although I did Skype with my brother in China for a bit in the middle of quilting - the internet is such a wonderful thing).

Off to do some more free motion quilting since I seem to have lost the shank and 1/4" piecing foot for my sewing machine!!! Arrgghhh!! Thank goodness I already pieced the next quilt along blocks!

Have a great day and thanks for stopping by!❤

Friday, October 19, 2012

"Design It, Quilt It" Online Class

I recently bought the Cindy Needham "Design It, Quilt It" class on Craftsy (I say "bought" because you own it for life and can refer to it anytime - it's great), and this week I had lots of fun practicing some of the things I learned. (I see that the class is $40 now, I paid $29 a few weeks ago - it was on sale). I review the class at the end of the post.


I made this 8.5" x 25.5" wall hanging using 4"- 6"lace doilies from my sister (they were just sitting in a drawer waiting to be turned into something else).

Because I took the Process Pledge here is how I created this piece -


I started by "glueing" the doilies to the piece of fabric - this was some thick, polished cotton I had laying around.


"Glueing" was done using a few small dots of Roxanne Glue Baste It - love this product, it dries very quickly and holds well, it also washes out. I use it for appliqué too.


I "auditioned thread" (that's from the class) to find the right colour. I ended up using all Wonderfil thread - 100Wt Invisafil for stitching the doilies down and for the free motion quilting and a metallic thread for some accents. The orange spool is Aurifil 50Wt and I used that in the bobbin.


From the class I learned that wool batting will split in half and can be used to make "designer batting" -


a layer of regular cotton batting (Hobbs Heirloom cotton in this case) and half a layer of wool batting (also Hobbs). This way it has the stability of cotton and the "puff" of wool (I find that wool batting alone is not always the best for wall hangings and little quilts - they don't lay flat, plus apparently wool migrates in wall hangings and shouldn't be used).


I stitched around all the doilies with a very tiny zig-zag and the walking foot.


 I tried stitching down all the parts - this took a long time.

the back of the quilt after the doilies were stitched down
Then the fun of the free motion quilting started!


I echo stitched around the doilies 3 times, the second time I used a darker 100WT thread.

I used this Clover iron out pen for my markings

Once all the echoing was done, I thought the doilies looked like snow flakes and so I added some lines of metallic thread to imitate wind movement. This was also part of the "divide and conquer" from the class.

Cindy Needham recommends a "Frixion" pen for marking but I think they should be avoided in quilting - they were not designed for fabric, so who knows what will happen to the fabric in years to come, and they don't wash out - they even take the colour out of some fabrics (I speak from experience on that one!).


I had to use a walking foot for the metallic thread since my machine doesn't like to sew with metallic thread (I also added some metallic accents to some of the doilies.

I then added different background fillers in the different "swathes" that the lines created.
Here are some photos -


This one used "Scribbling" from the class.
you can still see the nice puff from the wool batting


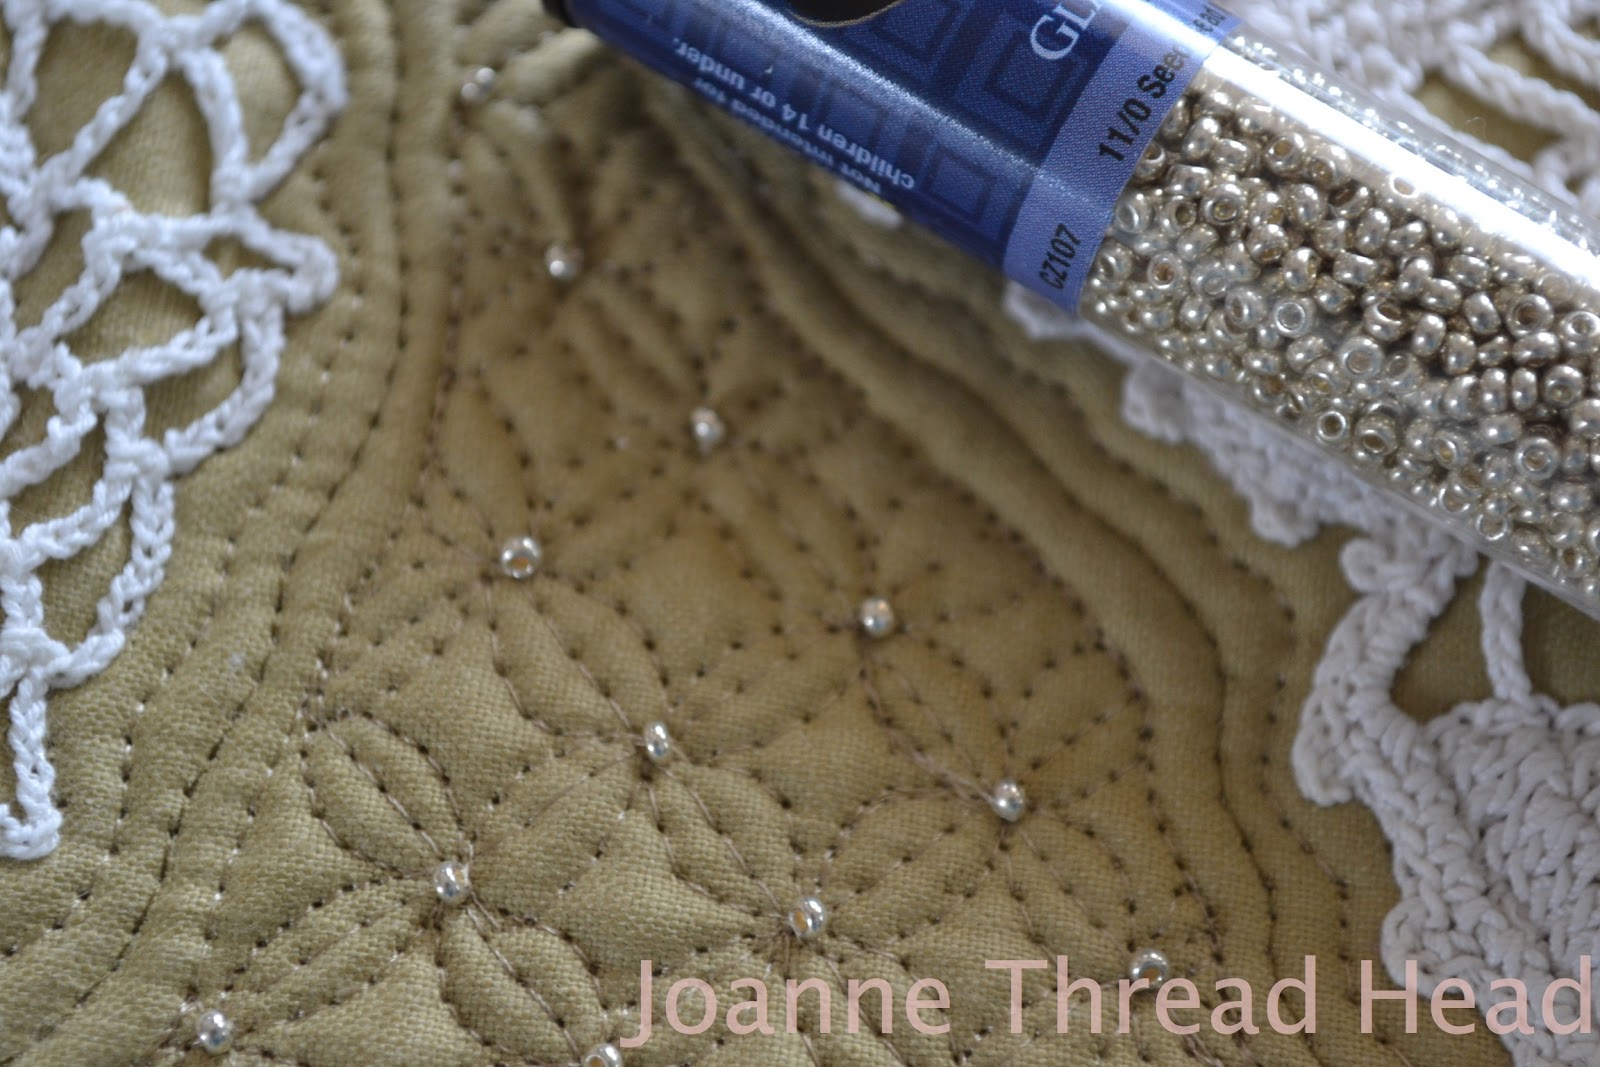
This design is "Cathedral Windows" (from the class), I added #11 beads by hand after all the quilting was finished.


I really liked this design - it is my own version of "S-curves" and pearls, I added some extra stitching to create depth/shadow. You can see that I also echoed the metallic lines in the above photo.


pebbles -which I love quilting
I thought the design under the penny looked like wheat
 - appropriate since I live on the prairies

The class was wonderful and my only complaint was that the Design Portion relied heavily on stencils (more on that later). I loved Cindy Needham's clamshells and once I realized that I didn't need a stencil, that they could be done with a grid, I had to add some (ignore the circle I had originally marked in the area).


I added detail to make them "Ginkgo Leaves". I steamed all those white lines out when I was finished quilting.

I tried to create "movement"
 with the stitching


In the above photo you can see that I didn't stitch the doilies down too flat, I wanted them to still show their designs.

the back - lots of thread!
I added 3" squares of fabric folded in half to make the hanging triangles in the upper corners (a great place to label the quilt too).

More about the class -

I loved the class and it was perfect for me (I am an intermediate/experienced quilter, that teaches free motion quilting). I learned a lot of new things - about tension, stitching in the ditch (ESS), some new to me background designs, and the elements of a good design. You can see all of Cindy's samples on her blog, and in the class it was nice to have her explain them.

My only complaint is that there was an over emphasis on stencils. In one of the online class discussions someone said that the class should have been called "Design It with Stencils". We were told that we didn't need to have stencils, but no real options were given for designing without stencils. You can see Cindy's stencil collection here (scroll down - it is the unflattering picture), so I am not surprised that she uses stencils, I would too if I had that many.

Is the class for you? -

The class is recommended for every level of quilter, and the class does have elements for every level of quilter. Having taught free motion quilting to absolute beginners, I would have to say that it is too advanced for absolute beginners (Craftsy doesn't show all the reviews before you purchase a class, only a few "5-Star" reviews, which I think is misleading - there are a couple of bad reviews on the class - that it isn't for beginners, and that it doesn't actually show you how to quilt - Craftsy does offer a 100% satisfaction guarantee).

If you are pretty comfortable free motion quilting, love Cindy Needham's work, and want to expand your quilting into a more decorative/heirloom/artistic style - than this is a great class.

If your goal is to just be able to quilt serviceable/practical pieced quilts (bed quilts, lap quilts, etc) than I would chose a different class. The "what to quilt, where" design portion I was hoping for, is not there.

Have a great day and thanks for stopping by!❤
Related Posts Plugin for WordPress, Blogger...