It has been two and a half years since I posted
my Beginner Romanian Point Lace Tutorial, and due to the amazing response
(thank-you!) I thought it was time for an Intermediate Tutorial.
The
beginner tutorial covered getting the foundation pattern ready, making the basic braid/cord, stitching the cord to the pattern, and some filling stitches. For this tutorial I assume you have tried my beginner tutorial (or have some experience with Romanian Point Lace), and I won't cover those topics in detail here.
In this tutorial I will cover making a more decorative braid/cord and making decorative rings, as well as some different filling stitches. I will also talk about some variations you could make to the pattern.
Since this post is long, if you are going to print it out there is a little
Print Friendly Button at the end of the post, that if you click will turn the post into a PDF, and you can then delete paragraphs and photos that you don't need.
Once again - I don't claim to be an expert at Romanian Point Lace, this is just how I do it. I taught myself from older European magazines.
I used 1 ball of DMC Cébélia #10 for this
11"/28cm doily. Any good quality crotchet cotton works. I like Cébélia because it is so smooth.
 |
| print on a 8.8"x11" piece of paper |
This is one third of the pattern. Trace the pattern three times, using the dotted lines as a guide.
As in the previous RPL Tutorial, the pattern is copied onto a piece of plain cotton and then covered with a sticky clear plastic film (MacTac etc) - this makes the foundation pattern for the work.
The pattern is the reverse of the finished piece.
 |
| work in progress |
Tip -
I know some people avoid the clear plastic film step, but the reason for it is that the foundation pattern needs to be quite firm, so that the needle weaving doesn't pull, and end up misshaping the final piece. Also with the plastic you don't accidentally stitch through the pattern. I have seen people use a hoop or frame for RPL, this would help keep the foundation pattern firm.
Once the foundation pattern is ready, crochet the braid lengths needed and tack them to the pattern, using regular sewing thread in a contrasting colour - this will be removed at the end.
I used about 17"/44cm of braid for each leaf, and about 22"/56cm for each flower. As well as some small pieces of braid as shown on the pattern.
I made a separate piece of braid for the centre of the flower, but you could use a continuous piece for the whole flower. I like to leave long tails on my braid since all the stitching and filling stitches are done with them, and it saves me having to add a new piece of cotton (that is the reason for the little bundles on my piece).
Stitch all the pieces of braid that touch together, using the little loops on the side of the braid. All the stitching is done with the #10 cotton. This is all covered in the
Beginner Tutorial.
There are a few pieces of decorative braid on the doily, just for variety, they could be plain braid if you want. The sections with decorative braid are shown as the parallel lines with little lines sticking out on the pattern.
Decorative Braid -
The decorative braid begins with a chain of 3 stitches.
Into the second chain make 1 Double Crochet (DC), and then 3 DC into the first chain.
Make one chain,
turn the work (flip it over, same as the plain braid).
Make 1DC into first DC,
and then 3DC into second DC.
One chain, then turn the work. Repeat.
Here is the written pattern for the decorative braid -
Work 1 double crochet into the 2nd of 3 chain, 3dc into the 1st chain,
*make 1 turning chain (turn work), work 1dc into the 1st dc, 3dc onto the 2nd dc*
repeat *-* as required.
Update 3rd Feb, 2013 - Apparently these are UK terms, and DC is Single Crochet in US terms.
You can work filling stitches before you have added all the braid to the foundation pattern -
Remember this is the back of the work and to travel through the bars on the braid to begin and end thread, and to move from one area to the next.
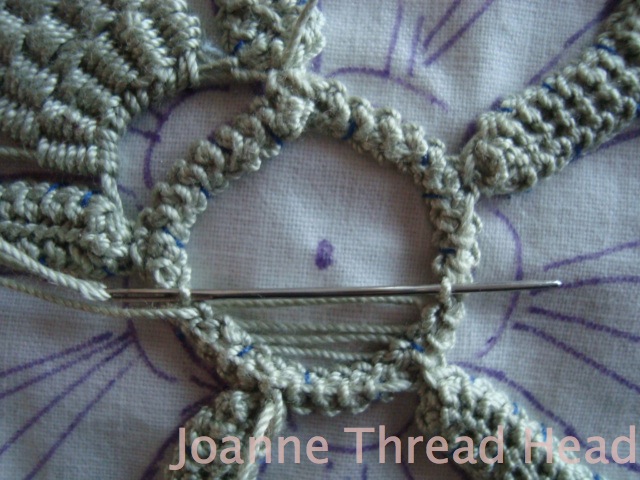
Decorative Rings -
These start with a loop of thread as shown in the above picture (sorry I can't really explain it, I follow a picture every time too).
Crochet DC around the loop. The DC will be over two strands of cotton of the loop
Make 20DC around the loop (you might need to try this more than once to get the hang of making these decorative circles - I know I did! But it does work. The trick is not making the loop too big and making all the stitches even).
Carefully pull the tail to bring the circle together.
Take a little stitch to join the circle together (sorry I don't know the crochet term).
Work another round of DC around the circle, but add a couple of extra stitches (about 3DC) as you go so the circle lays flat.
Finish the circle with a stitch joining the round and then cut, and pull the end of the thread through.
You need 3 circles this size,
 |
| 3 rounds of DC for centre - this is the front of the piece |
plus one for the centre that has another round of DC to make it bigger (remember to add a few extra stitches).
Tack them to the foundation, making sure that
the wrong side is facing up. I line up the tail with one of the wrapped bar lines so that it is ready for stitching.
Wrapped Bars -
These were covered in the beginning tutorial in the Spider Web variation #1 section.
The lines on the pattern are for placement of wrapped bars. They are made by stitching through a loop on the side of the braid at either end of the line - from one side to the other and back to the starting position - this creates two strands that are wrapped. Since there are no loops on the decorative braid or the decorative circle, just stitch through the edge.
Stitch all the wrapped bars around the circle. Since this is the back of the work, carefully travel through the back of the braid and circle.
For wrapped bars that cross each other - work the first bar, and for the next bar lay one thread below the first bar and one thread on top of the first bar.
Wrap the second bar like normal, and when you get to the join just pass over the top and continue wrapping the other side of the bar. Make sure to keep the wraps snug against each other, so that the work is nice and firm.
Spider Web -
Since this was covered in the beginner tutorial, I will go through the steps quickly.
Make a stitch with sewing thread in the centre of the spider web.
This acts as anchor for the bars of the web.
Lay all the threads down around the circle (there needs to be an odd number of bars for this web).
Wrap 4 of the bars like normal.
For the fifth bar just travel from the edge and start weaving the web in the centre,
under and over the bars until the centre is the size you want. Notice the 3 threads for the fifth bar.
Wrap the fifth bar, pulling the wraps tightly so that it comes out close to the same size as the other bars. I usually choose to have the fifth bar the shortest bar.
 |
| finished spider web |
Buttonhole Filler Stitch -
I chose an easy filler for half of the leaf, there are many other variations you could use too.
This photo is from "Needle-Made Laces and Net Embroideries" by Doris Campbell Preston, and shows how the stitch is made.
When I stitched this one I came up in the second loop from the previous row of stitching, and started the next row down in the next loop.
In the pictures you can see that I originally planned on having wrapped bars in the whole leaf, but thought a different filler would be better. The whole leaf could have different fillers on both sides instead of wrapped bars.
 |
| the flower is ready for filling |
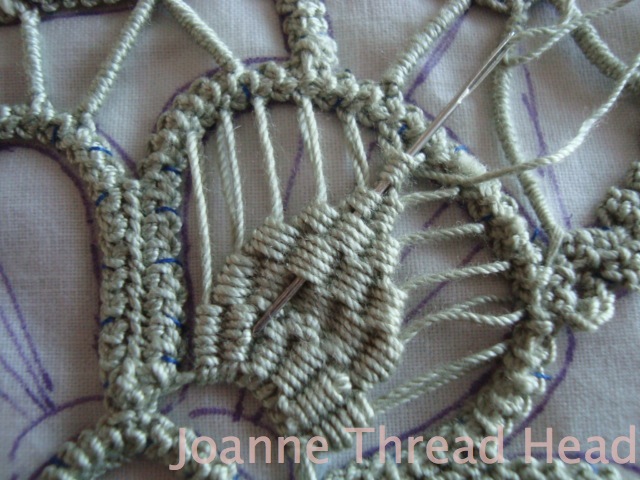
Petal Filler Design -
I liked the Petal design in the beginning tutorial so much, that I just did a variation of it for this doily.
I used about a
6'/180cm length of cotton for each petal so that I wouldn't have to join a new thread in the middle.
Start by laying a pair of threads across the base of the petal.
Wrap pairs of bars across the petal. Start by finding the centre of the petal and counting over 11 loops in the side of the braid - start in that loop, and stitch in every second loop until there are 12 pairs of thread.
Weave under and over
two pairs of bars at a time (see above photo).
Use the side of the needle and your finger nail to push the weaving close together.
Continue weaving across 12 pairs of bars for a small section,
then 10, then 8,6,4 and 2, until you reach the top, just like in the beginning tutorial.
To finish the end of the thread weave it in the back of the woven petal.
Carefully hold the thread at the top when pulling the thread so that it doesn't pull the point down.
Woven Centre -
This is made by laying threads - up one loop, down the next and across the circle,
until the circle is filled.
Repeat the process at right angles to the other threads, weaving them across,
until the circle is filled.
Instead of a braid circle with a woven centre, you could make a large decorative circle for the centre of the flower - attach the decorative circle to the foundation pattern before adding the braid for the petals.
Once all the needle weaving is complete, it is ready to be removed from the foundation pattern.
Use a stitch ripper on the back of the pattern to cut the tacking stitches, so that you don't accidentally cut any of the braid or needle weaving.
It is exciting to finally see the front of the piece. Wash and block the finished piece. If it needs ironing, press on the wrong side with the piece laying on a thick towel. I just let this type of lace dry flat and it doesn't usually need any pressing. After washing, my piece is about 11"/ 28cm.
The wonderful thing about Romanian Point Lace is that you can easily make changes to any pattern to make the piece "your own". You can enlarge or reduce a pattern slightly. If you enlarge a pattern you might need to add more wrapped bars, and make other adjustments. If you reduce the pattern consider using a thinner thread, #20 or even #30. You can also use different size threads in one project (I chose to use one size in my tutorials to keep things simple). You can change the filling stitches to the ones you want to try - the web is a wonderful resource for needle weaving stitches, and there are many embroidery books that cover needle weaving. Use different patterns for the braid..... Have fun!
If you have any questions or need any help with this pattern, please don't hesitate to email me (
email link found here).
April 2023 -This stunning one was made by Dawn from Wichita Falls, TX
This pattern is my original design. Remember copyright laws - don't sell the pattern or claim this pattern as your own, do not use it or items made with it for commercial purposes, or post the pattern or pictures elsewhere. Thank-you!