Friday, November 12, 2010

Another Mini Quilt and a Memory

In the Quilt Whisperer course that I took, Carla said that PPP (practice, practice, practice) was the most important thing in getting better at machine quilting, so that is what I have been trying to do. Mini quilts are a great, fast way to try new things.

I made this little 16" square mini quilt using leftover layer cake/charm square fabric, plus some leftover yardage. The fabric is "Alliance" by Howard Marcus. The center is made up of 1" squares and the borders are 5" wide. The quilting designs of free formed feathered hearts, swags, echoes and pebbles in the border and cross-hatching in the center (with a walking foot). I tried making the focus for the quilting in the center of the border rather than the corners. I used wool batting.

I used brown Invisafil and a #70 Microtex needle on my home sewing machine. I found that it was easiest to make the pebbles in a figure "8" pattern, looping one way and then the other.

I wanted to use an old hanger to hang the quilt from, so -

I made some little fabric tabs that I pinned to the back of the quilt.


DEM 1961-1989

On this day in 1989, my oldest brother died, he was 28 years old. He was very thoughtful and kind brother. The week before I started university he came to me and said that we were going there to find out where all my classes were, and when I was learning to drive, he would come to me and say lets go for a drive - never had to ask - just lets go! He was adventurous and had traveled all over the world. The last time I talked to him was the morning I was leaving to back-pack around Europe - he was so excited for me and gave me all kinds of tips. He died a month later - scuba diving at West Hawk Lake. He had just finished articling as a CA and was doing the things he loved after 3 years of hard work and studying. He is sadly missed by my family. I know that we are never forgotten by those who love us.

Have a great day and thanks for stopping by!!

Thursday, November 11, 2010

Crow and Pomegranate Applique Pattern


I was asked if I could post the pattern for the Crow and Pomegranate mini quilt I made last weekend. Since I don't know how to make a PDF, I thought I would just scan the pattern and see if it works. Here goes!!

If you click on the image, then click on "File" you should have the option to "Print Preview", make sure it fills the full page - you might have to adjust the scale (it worked for me when I decreased the margins to "0" and made it 150%), then print.


The center stem is a 1/2" finished bias and the stems on the side are 3/4" finished bias. The little circles are the size of a traced penny.
I used freezer paper applique method to make the mini quilt (my tutorial).


The background is a 14" x 9" rectangle (square to 13½" x 8½" after appliqueing), the borders are 3½" wide, and the corner blocks are 3½" squares.

*Update* - I assume prior applique knowledge for this pattern. I will post another appliqued mini quilt tutorial with more detailed instructions and pictures soon.

If any one can tell me how to make a PDF that would be much appreciated! I would love to add some applique patterns to the Thread Head Quilt Along quilt, and I think it would be very useful for people wanting to print out patterns for the quilt along.

Tonight's sunset

Have a great day and thanks for stopping by!!

Wednesday, November 10, 2010

Christmas Cross Stitch

Two posts in one day!! But I was so thrilled to finally finish this cross stitch - after having it sit for 3 years!

I don't know why I let it sit for so long, once I got to work on it, it only took me a week and a half to finish!! I had previously done the right arm, the hat and part of the beard - it is in the basket on my blog header.

It is a Lorri Birmingham Design called 'Tis The Season.

Have a great day and thanks for stopping by!!

Block #6

This block was inspired by something I saw on The Quilt Index (it does remind me of the CBC logo - for the Canadians).


For this one you will need -

Background (mine is white) -
2 - 3+7/8" squares for the half square triangles (HST) in the corners
10 - 2+3/8" squares, 8 for the flying geese and 2 cut in half on the diagonal (for the center)

Print A (mine is green) -
1 - 2+5/8" square for the center

Print B (mine is gold) -
2 - 3+7/8" squares for the half square triangles (HST) in the corners

Print C (mine is red with a pattern) -
2 - 4¼" squares for the flying geese

Make the center unit by sewing the 4 triangles made from the 2 - 2+3/8" background squares, that have been cut on the diagonal (I also trimmed the corners of the triangles) around the print A square.

This unit should be trimmed to measure a 3½" square.

Make the HST units with the 3+7/8" squares (2 of the background and the 2 print B) in the usual way (draw a diagonal line, sew ¼" on either side, cut on the line and press open). These should also be trimmed to measure 3½" squares - there will be 4 of these.

TIP - any time you need to make this kind of fast HST you will need 2 squares that are the size of the finished block plus 7/8" - in this case the finished unit will measure 3", so 3+7/8" squares were needed.

Fast Flying Geese -

Make fast flying geese with the 4¼" print C squares and 8 of the 2+3/8" background squares. I have described how to make fast flying geese here and there are some great online instructions, but I will quickly go through the instructions again. You need one large square and four small squares to make 4 flying geese.

Pin two small squares on the large square as shown, draw a diagonal line and sew ¼" on either side, cut in half on the line. Press as shown.

Pin a small square (with a diagonal line drawn on) as shown, sew ¼" on either side, cut in half on the line. Press the block open with seams going to the background.

Trim these fast flying geese to 2" x 3½" (there will be 8 of these).


Sew two fast flying geese together, they should be 3½" square, there will be 4 of these units.
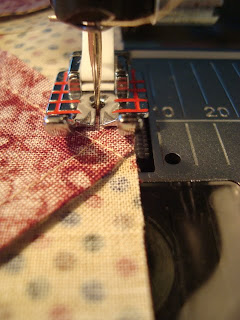
TIP - To "try" to maintain the points on the block, sew the seam a few fabric threads over (to the right when sewing) from the point (see picture - it helps to sew the block with the point on the top).

Now the units are ready to be sewn together.

Sew them together like a regular 9-patch.

Trim the block to 9½" (it will be 9" finished).

For the second block I chose to use the same print for the center, as well as the flying geese.

Karen makes the two blocks different each time and this block really lends itself to all kinds of possibilities.

By using two different fabrics for the 4¼" squares, for the flying geese this is a possibility or this -
You could also use a different background fabric for 4 of the flying geese....... have fun!!

Have a great day and thanks for stopping by!!

Tuesday, November 9, 2010

Decision!

In October I joined my first swap - a Secret Santa Swap over at Ouvrages d'une Acadienne. I have been thinking long and hard on what to make for my "Secret Santa" swap partner. I have been going through my partner's blog - she has a beautiful home, a sewing room of my dreams and she makes the most beautiful creations!!! I can't imagine what I can make for her!!!


So I have decided to make something with Crazy Quilting - my personal favorite. I will post pictures as it progresses - it has to be in the mail on December 1st.

Have a great day and thanks for stopping by!!

Sunday, November 7, 2010

Mini Quilt

This weekend I made a mini quilt.

I had a fat quarter of the blue border fabric and I knew I wanted to use it for a little quilt. I also wanted to do some applique - so I sketched out a design (inspired by many sources), and I also wanted to use some of the Quilt Whispering ideas I have been learning in the online course I took.
It is about 14" x 18", with cotton batting. All the machine applique (freezer paper technique) and machine quilting was done with Invisafil thread in the top and Aurifil thread in the bobbin, with a #70 Microtex needle.

I used 4" squares of fabric folded in half diagonally, and sewn in when I attached the binding as the way to hang this quilt (yes, that is an old paint stick as a hanger!). I have never tried this before, but it seems to work!

I hung it in my laundry room. I think this room is becoming my mini quilt room!! (The clothes pin bag is on my tutorial page.)

We have been having great fall weather here! I hope it is wonderful where you are!!

Have a great day and thanks for stopping by!!

Friday, November 5, 2010

New Books

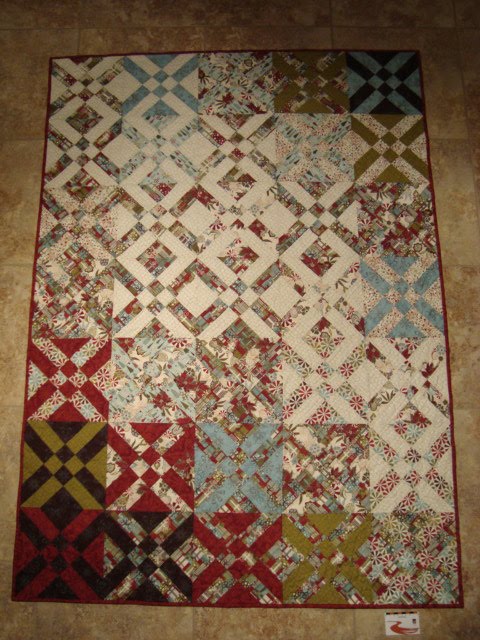
I finished the Christmas Arrowhead quilt.


It is 45" x 64". I used Warm and White cotton batting, with red flannel backing. I used 12 fat quarters (and an extra 0.5meters for the binding) of Figgy Pudding by Basicgrey. It was quilted on my home sewing machine using a #80 Microtex needle (the free motion quilting foot on my machine doesn't like a finer needle - the screw goes in too much and this is what caused the last FMQ foot to break), with light khaki Invisafil in the top and red Aurifil in the bobbin.


I decided to quilt a simple, all over design, because I didn't want the quilting to be the focus, I thought that the placement of the blocks and the pattern they created should be the focus. That is why I chose the Invisafil thread (it is a very fine #100 thread - hard to see in the picture).

The back - holly leaves and swirls.

The blocks of this quilt were designed by Anita Grossman Solomon, and I thought that the blocks were so ingenious that I decided to order the book they come from.

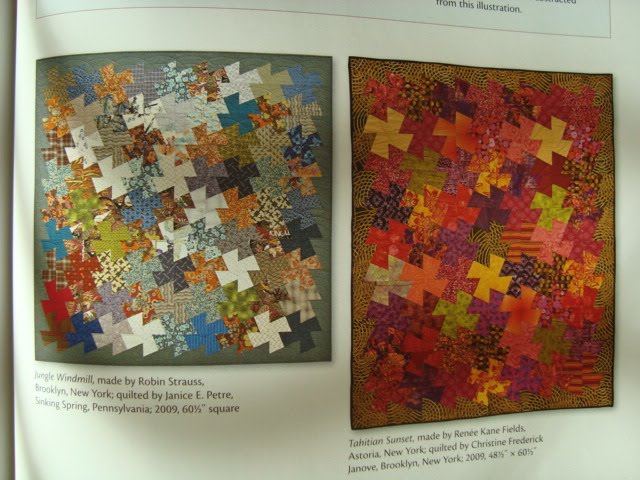
"Rotary Cutting Revolution" is a wonderful idea book - there are no quilt patterns - it is a book with 8 incredibly described quilt blocks! They are all wonderful and so well explained. You can preview the book here, click on the "google preview" symbol.

This "No Waste Windmill" block is one I want to try next, or maybe this "Old Italian" block....


I also ordered (to get the free shipping!!) this "my bread" book by Jim Lahey (not from "Trailer Park Boys"!). It was recommended by my parents and sister, and the book sure doesn't disappoint!

This is a "no-knead" technique to making bread that is so simple! It only takes less than 10 minutes of actual working time to make the bread - the secret is letting the ingredients (flour, salt, small amount of yeast and water) to sit for 12-18 hours, and then cooking the bread in a covered enameled cast-iron pot. I have made a few loaves so far and they have been delicious.

The taste and texture are amazing - like the best artisan/European bread. And so easy!!

Update - Here is a link for a version of the bread.
Update#2 - Here is an even better link with lots of cute pictures!!

Have a great day and thanks for stopping by!! ♥

Wednesday, November 3, 2010

Block #5

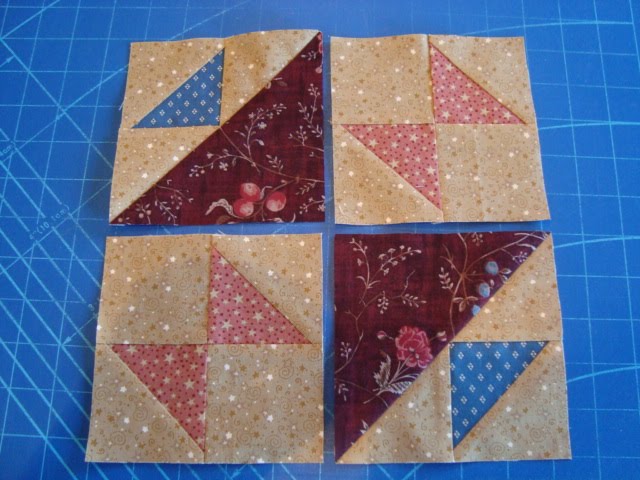
EQ7 calls this block "Old Maid's Puzzle", and it was pretty simple to make!
(If you are following along with EQ make sure that the block is a 9" finished size.)

For this one you will need -

Background (mine is beige) -
5 - 3+1/8" squares - 3 for the HST (half square triangles)
- 2 cut in half on the diagonal
4 - 2+3/4" squares

Print A (mine is dark red) -
1 - 5+3/8" square cut in half on the diagonal

Print B (mine is pink) -
2 - 3+1/8" squares for the HST

Print C (mine is blue) -
1 - 3+1/8" square for the HST

With the 3+1/8" whole squares, make the HST in the regular way (draw a diagonal line, sew ¼" on either side and cut in half), press the seams towards the background. Trim the HST to 2+3/4" (there will be 4 of print B and 2 of print C).

Tip - chain sew the HST down one side of the lines and then turn at the end and back down the other side of the lines.

With the four print B HST and the 2+3/4" squares make these two blocks. Trim them to 5"squares.

With the two print C HST and the four background triangles (half of the 3+1/8" squares) make these triangle sections. Join to the print A triangles. Trim these to 5" squares also.

The sections are all ready to be sewn together.

Trim the block to 9½" square.

I pressed the seams to one side on this one, and pressed the bulky centers open.

Two #5 blocks finished! I hope you enjoy making this one too!

Check out the other blocks on Flickr!

Have a great day and thanks for stopping by!

Monday, November 1, 2010

Blocks Sewn Together

I sewed together all the Arrowhead blocks. The designer recommended starching the fabric and pressing the seams open, so that is what I did on these blocks - first time for me. Because of all the diagonal seams and the fact that all the edges are on the bias, I was glad that the seams were open and that the blocks were starched!! I think there could have been problems otherwise! The blocks all went together beautifully. Now to decide what to quilt?


We had the last of the purple carrots from the garden today - delicious!

The Christmas cactus is blooming - seems to bloom earlier every year.

Have a great day and thanks for stopping by!!
Related Posts Plugin for WordPress, Blogger...