Tuesday, December 13, 2016

Hexagon Shaped Mug Rug Tutorial

I just finished a hexagonal shaped mug rug for Christmas, and thought I would show how I made the shape.


I can't give the pattern for the appliqué since I was inspired by a beautiful table runner I saw on Pinterest (here is the link). The original reminds me of Drunkard's Path blocks. I made mine using Invisible Machine Appliqué (link to my tutorial) with a simple partial circle for the snowman, circle-ish shapes for the eyes, and a carrot shaped nose. I embroidered a mouth with all 6 strands of embroidery cotton, using a stem stitch. My plan is to design some hexagon mug rugs in the future and wanted to have this tutorial on my blog for reference.

I like hexagon mug rugs because they are a bit different, and seem easier than making a circle mug rug (no bias binding!).

I am lucky enough to have this great set my Dad had at Military College.
For the hexagon template I started with a large piece of paper, and a compass.


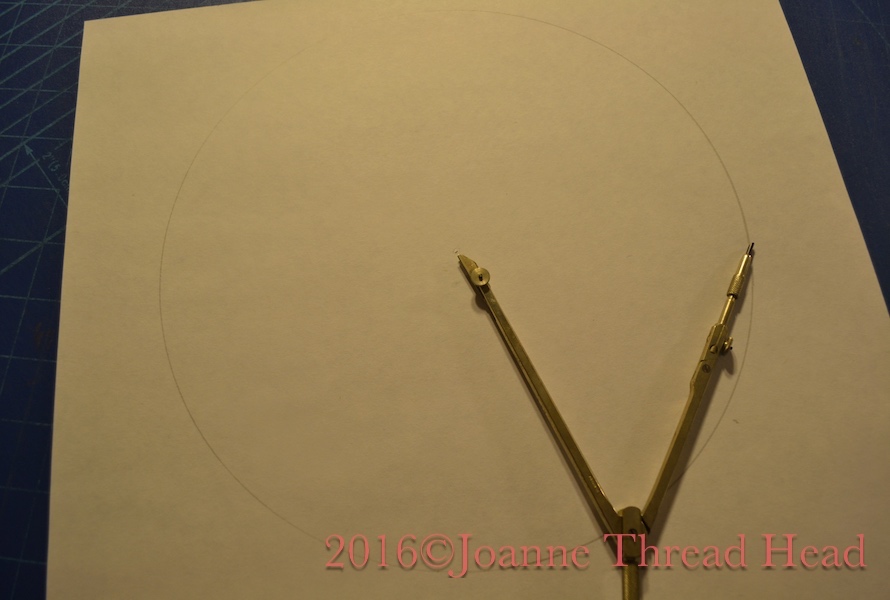
I drew a circle, mine has a radius of about 5" (the diameter of the circle will end up being the point to point measurement on the template).


Mark a point on the circle, and keeping the compass at the radius measurement start at the first mark and mark that distance on the circle, repeat until there are 6 equally distant marks on the circle (this is nothing new and I hope it makes sense).


Join the marks with straight lines,


to create a hexagon.


Cut it out (I use an old rotary cutter that I keep for paper), and there is your hexagonal template.


I had cut the appliqué piece slightly larger than then template and after machine quilting I trimmed it using the template.
I used 2 layers of silk batting for this mug rug - it is nice and flat, and I had scraps the right size. All the free motion machine quilting was done with regular sewing cotton.


For the binding I used single layer, 1+1/2" wide strips (this makes the little mug rug lay flatter than a folded, double layer binding). With a walking foot, I stitched the binding on (needle moved over 1/4" from the edge), just like a quilt with regular 90º corners - stitching along one side until 1/4" from the next side, turning the work so the foot is parallel to the new side, backstitching to the edge, lifting the foot, folding the binding to fold, and stitching down the new side.


I didn't quite know what to do with this angle the first time I had to bind one, but this seems to work for me.


The mug rug binding all ready to be stitched down on the back by hand.


I have a chair with a little round table attached and I think a hexagon is a perfect shape for it (this mug rug is about 10" point to point and about 8.5" side to side). The machine quilting is very dense because I wanted the mug rug to be very flat. I quilted double loops on the snowman, micro-stipples in the background and parallel lines on the nose.

The Partridges are back for the winter - just a flock of 3 so far.
Have a great day and thanks for stopping by!

Wednesday, November 30, 2016

Little Hanger

When my children were born they each came home from the hospital in this sweater.


Hard to imagine they were this small - the sweater is so tiny, only 10" from top to bottom, and it was big on my babies. My Mother made the sweater almost 26 years ago when I was expecting my first child. Hard to photograph the colour - it is a lovely shade of grey green, with mother of pearl buttons. The pattern is a classic baby sweater designed by Elizabeth Zimmerman (Baby Sweater on Two Needles).
It just seemed too cute to be sitting in a trunk so I thought I would make a little padded hanger and hang it in my sewing room.


I used Liberty Tana Lawn cotton for the hanger (a folded regular metal hanger is inside).


Finished with a bow.


It goes well with the collection of baby clothes already hanging in my sewing room (the other ones are from my Mother's family).


The hanger was a little break from quilting this medallion quilt. I have stitched in the ditch with a walking foot, and am now deciding what to quilt where!


Another break was over-dyeing some handspun yarn that I just didn't like the colour of.


The ones in the pot ended up being dyed with black (the two skeins at the top), and the lower one was over-dyed similar to a pair of socks I just finished knitting and loved the colour scheme (it had started out a very pale, odd colour). I am much happier with these colours.


Theses are the socks I just finished knitting with store bought yarn that I dyed.

Have a great day and thanks for stopping by!

Thursday, November 24, 2016

New Pillows

I decided to take a little break from quilting the Circa 2016 Medallion quilt and make some new pillows (I even repurposed some old feathers pillows and a down duvet to create the insides - quite the mess! I have 2 more covers to make). 


I decided on really simple designs. Here is what I did -


This one is about 8"x16", made with 21, 2" half square triangles (I cut 3" squares to make the HST, trimmed to 2+1/2"). I added a 1+1/2" border around the blocks.


For the appliqué I chose simple circles (even the leaves are circles with points). I used the invisible machine appliqué technique for the appliqué.


The free motion quilting was really simple too - continuous curves in the dark triangles and stitching in the ditch around the appliqué pieces, and border. I used 100wt thread for the appliqué and free motion quilting for both pillows.


This one started with a 6" log cabin block (made with 1/2" 'logs' - from cut 1" strips). I bordered it with a small 3/4" (cut 1+1/4") border and a 3" border.


More simple circle appliqués.


For the free motion quilting I stitched in ditch around the logs, small border and appliqué pieces. The large border was quilted with irregular, parallel lines. This pillow is about 14" square. Both pillows are finished like a regular quilt with a binding (cut at 2+3/4" to accommodate the thickness of the added backing), and they have button closures. Most of the fabric for these pillows is by Jo Morton.

The other day our little visitor was enjoying some sunshine.
Thanks for stopping by and have a great day!

Saturday, November 19, 2016

Circa 2016 Medallion Quilt Top

The fabric for the plain (floater) borders for my medallion quilt came, and I was able to finish piecing the quilt top.


 With the final border it is about 89"x94". It is all ready for quilting now!


While I was waiting for my fabric to do a scenic tour of Canada (it was lost in transit for awhile), I knit a hat from some leftover yarn that I spun last year. The pattern is Folkston by Susan Mills.

Have a great day and thanks for stopping by!

Wednesday, November 16, 2016

October Westering Women Block


Today I made the October Westering Women block - super quick and simple this month. The block is called Rocky Mountain Chain - the blocks tell the story of western imigration in the 1800's, so I guess we are getting near the west coast with a Rocky Mountain block.


Only 2 more blocks to go before the quilt is finished.
When I was looking for the pattern today I was surprised to see my last month's block on today's Civil War Quilts blog post - it is my favourite quilt block so far (and the hardest to sew).

This week I finished knitting a couple of cowls, using yarn that I dyed and spun.


I find little cowls really practical since I am usually cold.

Sunset with the laser Christmas lights shining.
Have a great day and thanks for stopping by!

Monday, November 7, 2016

Medallion Quilt Outer Border


I finished piecing the Courthouse Steps blocks, and sewing them together for the outer pieced border of the Circa 2016 Medallion quilt. I am just waiting for some fabric to come in so I can add the plain borders, and finish piecing the quilt top.


My knitting is also coming along nicely - I love knitting gradients.

Have a great day and thanks for stopping by!

Saturday, November 5, 2016

Ready for Chain Piecing!


All the pieces for the 44 Courthouse Steps blocks are cut out and ready to be sewn. This is my favourite kind of piecing!

Sunset last night
Have a great day and thanks for stopping by!

Thursday, November 3, 2016

Growing Medallion Quilt


I finished piecing the Saw Tooth block border (I need to buy some fabric for the plain fabric border/floater border, so it isn't attached yet).


I also starting piecing Courthouse Steps blocks for the outer pieced border on the quilt. This quilt will be a full sized bed quilt when finished.


Recently I have had to take apart a couple of knitting projects that were not working out, so I decided to start something new, and I did some dyeing.


This is the first gradient spun up, and I have started knitting a cowl. This was a quick spin to make 'Energized Singles' - there is a lot of twist in the yarn, which creates an interesting texture to the knitting (because of all the twist it is knit straight from the bobbin). This is the first time I have tried this technique - it is always good to try something new! This gradient is the bottom one in the above photo that shades to green.

Have a great day and thanks for stopping by!

Monday, October 31, 2016

A Little Knitted Project


Yesterday I made a little knitted pumpkin with some leftover wool.


The pattern (Chic Little Pumpkins) is free on Ravelry until the 2nd of November 2016. It was a fun, little knit, and a perfect fall decoration.


I also finished sewing thirty four 5" Saw Tooth blocks for the next border on what I am now calling the Circa 2016 Medallion Quilt.

Have a great day and thanks for stopping by!
Related Posts Plugin for WordPress, Blogger...