Tuesday, August 31, 2010

Catching Up

I think I have finally caught up on all the things associated with returning from vacation (laundry, sleep, tidying up....). I have also been trying to go around to all my favorite blogs! I think that will take a while - it seems like everyone has been busy and there are so many wonderful things to see!!

Menagerie at the Wallace Building, U of M

When we came back from vacation there was a celebration over the week-end in honor of 100 years of Geological Sciences at the University of Manitoba. Both my husband and I graduated from geology, so it was wonderful for us to see professors and people that we had worked with. The only disappointing thing was that there was no one else from our graduating classes (my DH also has a masters degree).

Yesterday I machine quilted the mini quilt I pieced at the beginning of August. It is 20" x 27" (51cm x 69cm).

I usually have a darker border than the center, so this mini quilt was a great way to try something new for me. I finished sewing on the binding today.

I received a centimetre scale at the reunion -

and I thought it would be a great idea to add to my photos to give an idea of size.

Thank-you to everyone that has taken the time to leave a comment!!

Have a great day and thanks for stopping by!!

Sunday, August 29, 2010

Glad to be Home

I am glad to be home. We had such an amazing trip to Italy!!! Everything went well and we had no problems.If you would like to see a "few" of my pictures I have added a new blog page for the vacation pictures.

Thanks for dropping by and have a great day!!

Sunday, August 8, 2010

Getting Ready!

Today we were getting everything ready, because we are leaving for Italy tomorrow.
I took some pictures of the garden before -

Tomatoes, peppers and cucumbers.

Back yard with vegetable garden beside trampoline.

Herbs, rhubarb,flowers and cucumbers in the back.

Front garden.

Now most of the annuals have had all their flowers removed and they have been fertilized.

The front garden looks like this now!

and the composter looks like this!

Removing all the flowers and fertilizing before going away is a tip I read in a Lois Hole book, and it really works. When you get back from vacation, the flowers have started blooming again and there is very little work. But it is always sad to see the garden this way!

I did get time to do some stitching - fixing back-packs and sewing on flags.

Sorry I haven't had time to respond to all the kind comments - just know that I really appreciate them all!!
Have a great rest of August, see you in three weeks with lots of pictures! Thanks so much for stopping by!!

Friday, August 6, 2010

Little Drawstring Bag Tutorial


I made this little bag to hold some tatting for the trip. I have to keep my hands busy and tatting is the smallest thing I could take. It is 6" x 4", and just two layers of fabric. I didn't add interfacing or batting (or diaper flannel - my favorite for bags), because I wanted a very lightweight bag.

I cut two rectangles of fabric with the lining a couple of inches longer the the main fabric (the squares on the board are 1", if you want to make it the same size). The extra inches of the lining will make a contrasting ruffle at the top of the bag. Add more inches if you want a bigger ruffle.


I sewed the two short ends together - lining to main fabric, making a wide tube. Press the seam allowances towards the lining.

Matching seams, right sides together, pin the sides of the bag. If you click on the picture, you should see where I placed pins to show where to leave openings. Sew the sides leaving openings of either side, just below the seam on the main fabric side (this will be openings for the cord casing). Also leave another opening on one side of the lining - this is to turn the bag around when sewn.

Sew the side, paying attention to the openings.

Turn the bag around and stitch up the opening. I just did this with the machine since it is on the inside of the bag.

Tuck the lining into the bag, until the inside corners are nice and even, and the bag is smooth. Iron the top ruffle of the bag, pressing the seam allowances open where the casing will be. This picture shows the ruffle and the opening for the casing.

Make the casing by top stitching two rows. The first is in the ditch between the two fabrics. The other should be wide enough to fit the cords/ribbons you will use. (Don't ask me how I know this!!! The bag took about 10 minutes to make, but trying to fit various cords/ribbons that would work properly took about an hour!)

I stitched across the corners on the inside of the bag to make a bottom for the bag, and to hold the lining in place.

The final bag. I opted for a handles on either side of the bag (to make closing easier), if you just want a single cord you will only need to leave an opening on one side.
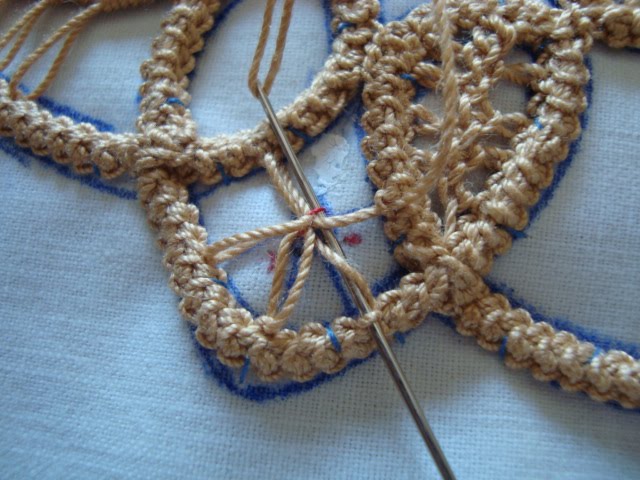
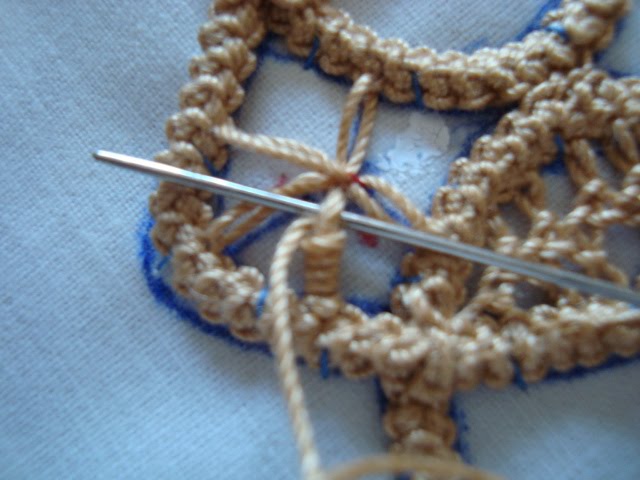
This is the tatting I have been working on.

Update February 11th, 2015 - 


I made a larger version of the bag - measurements can be found here.
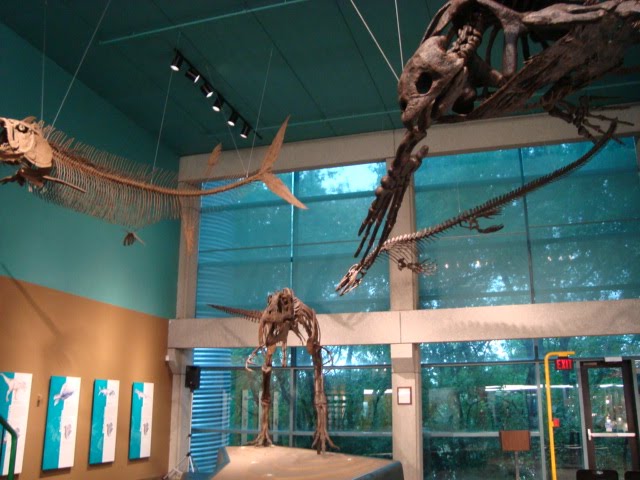
PJ's

My youngest has had these PJ's on my sewing machine for a few days, so I thought I should get to work on something useful! He needed new summer PJ's.

I cut up his old, worn PJ's and made new ones.

I like to use this stitch on my machine (#6) when I do casual hemming on knits. It is like a twin needle (my favorite for knits), but I don't need to have a second spool of thread. It also has some stretch to it.

I try to get the stitches over the edge of the hem, to make a neat, flat hem.

Have a great day and thanks for stopping by!!

Thursday, August 5, 2010

A Mini Quilt Top

I received this months fabric club selection this week (from Kick Ass Country Store), and since it matched the scraps from my Pinwheel Sampler Quilt I decided to try a mini quilt.

I love Kathleen Tracy's blog - A Sentimental Quilter - and was inspired by a quilt that I saw on her blog. Using some scraps, three fat quarters and EQ7 I made this little quilt top -

It is about 19" x 25½". The colours are much better in person. The fabric is by Howard Marcus - mainly Alliance, but the border is another line. Another quilt top to be quilted in the fall.

Next week my family and I are leaving for a trip to Italy, for 2½ weeks. We are staying the first few days in Rome and then a week at a villa in Tuscany. The last few days are still undecided (we are not normally planners). If anyone has any "must-sees" they would like to share, that would be wonderful!
My DH and I back-packed around Europe, twenty years ago (when we were kids!), and never did I imagine that we would be going back with our two boys, but things just fell into place. I am still pinching myself!

Have a great day and thanks for stopping by!!

Monday, August 2, 2010

Romanian Point Lace Tutorial

A few people have asked me about Romanian Point Lace so I thought I would post a tutorial.

Romanian Point Lace Ornament (4")

I taught myself last year from a January 1990 issue of an "Anna" magazine and a Sept 2004 issue of "Embroidery Canada" magazine. This tutorial is how I do Romanian Point Lace, I don't claim to be an expert. I am offering this pattern I designed as a way to give people a "taste" of RPL.
Romanian Point Lace consists of a crotchet braid that is tacked to a pattern and then embellished with needle embroidery. All the work is done on the back of the piece.
Click on the pictures to enlarge and see detail.

Not many supplies are required, you probably have them at home already.

I use #10 crotchet cotton.
Size 1 crotchet hook (small hook - whatever size you have will probably do).

A scrap of plain cotton (I use an old plain sheet) for the pattern.

Small piece of clear "Mac Tac" (some sort of sticky backed plastic) to cover the pattern so you don't stitch to the pattern. Not every one uses this, but it makes it easier and also makes the pattern stiffer.

Contrasting sewing thread to tack the braid to the pattern.

Fine sharp needle (and thimble) for tacking the braid to the pattern.

Blunt (tapestry) needle for doing the needle embroidery.


Romanian Point Lace starts with a crotchet braid. They key to this simple braid is to turn the braid after every stitch (really 2 stitches - sorry I am self taught and don't know the technical terms!).

Braid -


Some close up pictures of the braid-

After turning the braid, go under the 2 stitches

Make one stitch
and then make another stitch

The braid is ready to be turned (always turn the braid the same way, clock wise if looking from the top).

This results in a braid that is the same on both sides, with little loops on the side and bars across the braid (from turning the braid).


When making a long braid it is helpful to tie the braid up with an elastic. A pin in the loop at the working end is useful so the braid doesn't unravel when you put it down.

You will need about 81cm/32" of braid for this ornament.

Now you are ready to work on the pattern.


Trace the pattern on a piece of plain fabric (I use a ball point pen).

Cover with clear "Mac Tac".

Cut out.

Starting at an overlapping join on the pattern (this will hide the join), tack the braid (starting with the beginning end of the braid) to the pattern with the contrasting sewing thread and a fine sharp needle.

Secure the start of the sewing thread by taking a few stitches at the back of the pattern. I tack the braid by coming up in between the bars on the braid, then going down beside the braid on one side and then the other. Take care not to stitch through the bars and also don't tack on the side where there will be an adjoining braid.
Also pay attention to the way the overlap/under laps are on the pattern when tacking it down.


On the pattern there are also spiderweb designs. Add a little stitch at the center of these designs (4) with the sewing thread (I switched to red thread so that it would show up).

The back of the work, the braid is all tacked down.

When you reach the end of the work (this is what I meant by starting at an overlapping join on the pattern), unravel (or add more stitches)the braid so the two ends will meet. Cut the crotchet cotton so that there is a long tail, thread on a blunt needle and make a stitch through the loop(s) at the end of the braid.

Stitch the ends together and to the underlying braid.

All the overlaps and joins need to be stitched together.

Travel from one section to another by going under the bars. Remember that this is the back of the piece.

Join the braid using the loops on the side.

Stitch every where the braids touch,

and overlap.

Now the piece is ready to have the decorative needle embroidery added.
There are many options. This is how I choose to do the stitching. Like anything you make you can change it to suit your taste.
Anchor the starts and stops of thread in the bars of the braid (also why I leave long tails on the braid so it is ready to be used). Make sure not to make any stitches through the pattern (it is only temporary and will be removed).
Use the blunt/tapestry needle for all this work.
Use the loops at the side of the braid when stitching.

Petal design -

Make sure you have an extra long piece of cotton threaded when you start this design.

Stitch 12 pairs of threads around the arch. All coming from the center and evenly spaced around the top (I use every second loop). There should be 6 on each side of the center.
Once the thread has been anchored at the bottom, start needle weaving under and over 2 sets of bars.

The first section is almost finished.
Keep pushing the weaving down to make it even.

Evenly weave 12, then 10 (8,6,4 then 2) pairs of bars to fill in the leaf shape. Always weaving under and over two pairs of bars.

Spider Web variation #1 (uneven number of bars) -

Coming from the side, stitch under the tacking thread.

Repeat for the all the spider web bars.

All the bars are in place.

Ready to start wrapping the bars (I am right handed and work this direction).

Wrap 4 bars only.

Come up at the 5th bar,

don't wrap it, but start weaving under and over the bars (there are 3 threads for the 5th bar now)

until you have the size center you want. End at the unwrapped bar and

wrap the last bar.

Fern Design -
Coming up at the side near the bottom of the shape

stitch in the loop across and slightly higher, coming under the thread (like a herringbone stitch)

continue up the space in the herring bone stitch.


When you reach the top, stitch in the center loop.

Make loops of thread on either side of center over the herringbone stitches (feather stitch)

work a feather stitch down the shape.

Spider Web variation #2 (even number of bars) -


Like the other spider web, lay the bars under the tacking thread.

Wrap 4 of the bars.

Wrap the 5th bar to the center

and start wrapping around each of the bars in turn, counter clockwise,

this is different from the other spider web variation.

Wrap around the center, until the size you want, stopping at the unwrapped bar,

wrap the last bar.

All the stitching is finished! Clip the tacking threads and remove from the pattern, flip the piece over to see the final results!

Wash in hot water and block (you can iron from the back on a towel) the ornament (it will shrink slightly and become firmer).

I hope you give Romanian Point Lace a try. It is really very simple (maybe not from my instructions!).

There are other ways to make the braid.


These are the two types of braid that I need for the table center that I am working on (the top one is the regular braid, the bottom one will be the decorative outer edge).

Here are some links you might be interested in -

You Tube has some videos for Romanian Point Lace (not in English, but it will give you some ideas).
There is a Flickr group for Romanian Point Lace too.
Elena seems to be a real expert on RPL.
There are also some books out there, I can't comment on them as I haven't actually seen them.
It is easy to draw out patterns and you can also try using Batten-burg Lace patterns.

*Sept. 22nd, 2010 Update* -here is the pattern for the decorative outer edge braid.

*Dec 3rd, 2011 Update* -  Ravelry has become a great resource for RPL.

* Dec. 20th, 2011 Update* - Here is a link for the PDF for the pattern

Good luck and let me know if you give it a try (or if you need any help).

Remember copyright laws - don't sell or claim this pattern as your own, do not use it or items made with it for commercial purposes, or post the pattern or my pictures elsewhere. Thanks!


Lucy's Ornament. Great job!!
Related Posts Plugin for WordPress, Blogger...