Saturday, April 27, 2013

Blocks of the Month

I finished all my blocks of the month today (nothing like waiting until the end of the month!).


These ones are for my online quilt group - we are working on a quilt called Pieces of Time by Lori Smith.


Here are all my blocks so far.


This block is part of an Ostrich Block of the Month with a local quilt group - this one is a Square in a Square, I chose a 9" block from EQ7.


This BOM is fun because there are no patterns, just an idea every month, so we get to make what we want.


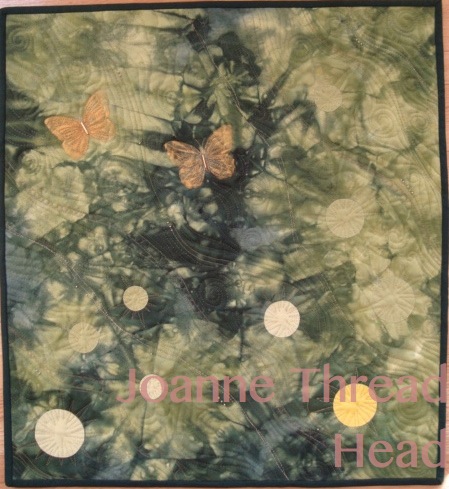
This one is my Art Quilt of the Month. It is supposed to represent the tulips growing before the snow melted in the garden. I tried appliqué this month - I used Glue Baste to attach my pieces before quilting. This one was inspired by a friend who is also working on Art Quilts of the Month, she recently made some beautiful little quilts that can be seen on her blog - thanks for the inspiration Susan!

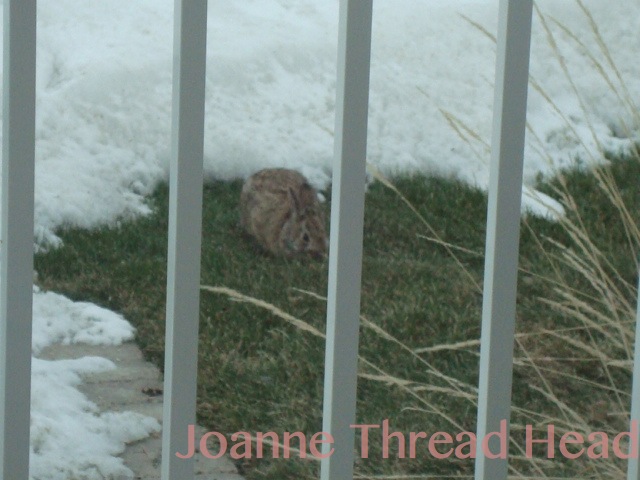
I was very surprised to see the tulips growing last week, but now the rabbits have eaten them all - I guess they thought it was a pretty long winter too and are glad to have something fresh to eat. 


Here are my four art quilts so far - they are all 6" x 8".


The snow is really melting, just the deep drifts left, but warm days are on the way! As I am writing my husband is taking the snow tires off our cars, another good thing!

Have a great day and thanks for stopping by!

Friday, April 26, 2013

Log Cabin Quilt and Spinning

I finished the log cabin quilt!


I have always wanted to make a log cabin quilt and was so pleased to finally have a large enough variety of coordinating fabrics to make one.
The blocks are 7" square, with a 13 by 13 layout (there are 2197 pieces in this quilt!). The "logs" are 1" wide (cut 1+1/2"). The design is an Off Set Barn Raising. It is 91" square. I used silk batting because I wanted it to have an "old-fashioned" look after washing (silk batting shrinks a bit, and wool batting doesn't).


 I quilted feathers in the light sections, and lines in the dark sections.


I used a walking foot with a guide for the lines - they are 1" apart.


I used Genziana thread for all the quilting. It is an Italian thread, very fine, like Aurifil, but available at a local fabric store (I have to order Aurifil online). I have used it before, but this is the first time I quilted a whole quilt with it and I couldn't believe the amount of lint that it generated. It is still a very nice thread to use.


This quilt is for my son's bed. He has a single mattress on an antique bed frame that is between a single and a double bed in size, so it needs a big quilt to hide the frame (there is a big down duvet under the quilt making the bed look big). I chose an off set layout because I didn't want a large "bull's eye" in the centre of the bed.

Last week I said that I had a choice of things to work on, and I did spin some wool before getting to the quilt.


This was the starting fibre bundle - Merino from SweetGeorgia, in the colour-way Tavern.


I split the fibre across the length, and with one section I split it down the length a few times, so that the colour changes would be short. The other half I spun as is, so the colour changes would be long.


Here are the resulting bobbins - the one on the left has the short colour changes and the one on the right has the long changes.


Here is the wool all plied. It came out to 14 wraps per inch, about a DK weight.


I spun the wool to go with some natural Merino I had spun the week before, to make a scarf. This is the "Alex Scarf" from the Craftsy class Explorations in Brioche Knitting. The pattern is so lovely, and just challenging enough to make it very interesting to knit. You can see more of these scarves on the Craftsy project page.


You can see the colour changes on the back of the scarf.


I have some more Merino of the spinning wheel - for this one I am spinning a lace/fingering weight yarn - it will take a long time to spin. This one is also Merino from SweetGeorgia, in a Pomegranate colour way .

Have a great day and thanks for stopping by!

Friday, April 19, 2013

Week In Review

The week flew by!


I made a wall hanging from a fat quarter of fabric that I hand dyed (I hated to cut it up, and so used the whole piece). The fabric reminded me of being in the woods on a summer day, and looking up at the sun shining through the leaves. This piece was tray dyed - I packed a piece of dry fabric in a small plastic container and added a different colour dye to each side of the container (in this case yellow mixed with a bit of black on one end, and green with a bit of black on the other end). This is 20" x 22".


I added circles of coordinating hand dyed fabric to represent the spots of sun shining through the leaves, the quilting enhanced that idea.


I stamped some butterfly designs with gold paint.


Also free motion quilted to give the piece a feeling of movement - like the wind through the leaves. I added some beads by hand when all the stitching was complete.


I also did some spinning -  the bottom skein is merino wool for a scarf, and the top is mohair and wool, I was practicing spinning fine for that one -


and I am pleased with how it turned out.


I finished off the practice pieces for the Craftsy Short Rows class - I can see there are lots of possibilities for short rows in knitting that I never knew, like set in sleeves, knit from the top down.

Up next I have a couple of projects I could work on -


I have everything I need to quilt the log cabin quilt or


some beautiful fibres I ordered from SweetGeorgia just arrived! Tough decisions - life is good!!

Other things around here -


The rabbit seemed pleased to have some grass to eat now that the snow is melting,


and the tulips are coming up (even though they are surrounded by snow, and temperatures are well below normal), so nice to see!


Plus we have a new arrival to the driveway - some other members of my family have a new hobby too - they are super excited!

Have a great day and thanks for stopping by!

Friday, April 12, 2013

Wrap Around Cowl

I made a wrap around cowl, it is the first wearable piece I have made with my hand spun yarn!


I had 32g/1 oz of BFL from Sweet Georgia Yarns (it is from their Spinning Colour Six-Pack), the colour is Summer Dusk, and I used 83g/3 oz of natural merino (from a good friend).


I spun the BLF evenly and quite thin, and the merino was spun thick and thin.


The two were coil plied together. It is super soft!


You can see the yarn better in the above picture.


My sister happened to drop by, and was so kind to agree to be my model for the cowl! Thank-you!

I got the idea for this project from the free Craftsy class Short Rows - which was fabulous and better than some of the Craftsy classes that I paid for ("Shoot It" in particular!). I used the 'wrap and turn' with variation.


You can see the short rows in the above photo. This idea is used to make shawlettes - maybe one day I will spin enough yarn for one.

How I made the Cowl -

For the cowl I cast on 100 stitches, on size 8mm needles. I did 3 rows of garter stitch and then started stockinette and the short rows - making each row 6 stitches shorter until there was no more room. Once all the wrap and turns were picked up I finished the piece with rows of garter stitch until I had just enough yarn for casting off. I finished it off with a big mother of pearl button on one end and a loop on the other end.
It was hard to determine the size of the yarn because it is thick and thin, it varies between double knit and bulky.

I made a wrap around cowl because I didn't want a cowl that needed to be pulled over my head. Since it is still cold here, I'll be able to wear it now!


Can you spot the pair of grey partridges in the above photo - they spent the morning hiding there.

Thanks for stopping by and have a great day!

Thursday, April 11, 2013

More Feathers

I am still quilting feathers! Can't seem to get enough!


I wanted to see how this style of feathers and background fill would look on a bigger scale (for the bed sized whole cloth quilt I am planning).


Normally I use a 1/2" size grid for the background, but I used a 1" grid for this one.


This piece is 20" x 42", plain cotton with one layer of cotton batting and a half layer of wool batting on top. I used Invisafil thread on top, and Aurifil thread in the bobbin for the quilting.


I marked all the stems with a Hera marker before quilting.


Once all the feathers were quilted I divided the background.


I marked a 4" 'border' line from the outer edge.


I am using it as a buffet runner in my dining room. We recently painted the main areas of our home - they were 'cool' greens and beige,

this morning

but after six months of seeing snow outside, I wanted 'warm' colours, and chose orange for the dining room and two shades of gold for the rest.

Thanks for stopping by and have a great day!

Wednesday, April 10, 2013

Brioche Knitting

This weekend all the Craftsy classes were on sale for spring, and of course I bought a few.

I had never heard of brioche knitting, but the class 'Explorations in Brioche Knitting' looked intriguing. Here are my samples -


This is the first sample made with one colour. It makes a nice lofty knit fabric.


This is the two colour sample, and this is where brioche knitting really shines.


The knit columns stand out against the contrasting background, and the back is the reverse colours. The sample also shows "syncopation", where the column colours are reversed.

The Craftsy class was wonderful! The teacher, Nancy Marchant, wrote the book on brioche knitting, and everything in the class was incredibly well explained. Now I just have to spin enough wool to make the two colour scarf from the class.

Thank-you so much for the wonderful response to my Free Motion Tutorial! I hope you are learning something new too.

Have a great day and thanks for stopping by!

Wednesday, April 3, 2013

The Evolution of My Quilting Samples

I wrote a tutorial on developing your own style for free motion quilted feathers for the SewCalGal 2013 Free Motion Quilting Challenge, and thought I would share the evolution of my quilting samples here. Click on the names of the pieces for more details about each piece.


For this Vase and Feathers piece I quilted feathers with rounded ends, but tried a different (for me) shaped tip - 


Kind of elongated diamonds. I also did the quilting in two different colours, but just different shades, so it is barely noticeable.

This Stupendous Stitching and Whole Cloth piece was next - 


I used the same elongated diamonds for the tips of the feathers, and the same round ends,


but this bottom feather came out with a big tip and a more pointed end. I really liked that one, so for the next piece I went with that.

The piece also had feathers that didn't overlap - normally I kept the lobes of the feathers separate -


But I overlapped the lobes in this section -


And liked the look of that too. The lobes are also uneven in size.


I made the ends of the feathers pointy,


And the tips of the feathers noticeably bigger. I also tried to make the lobes even, and gradually increasing and decreasing in size.


I also included more overlapping of the lobes. This turned out to be one of my favourite pieces that I have ever made!


For the above piece I tried dramatically different colours of threads for the main design and the background. It has the same pointy feather ends, large tips and overlapping lobes, because I love that look. I divided the background into three sections with a curved line, and quilted each section differently. Because these are such small samples it is good to try out different backgrounds.


I quilted the above piece to try out a quilting design with feathers radiating from a centre circle, because I am planning a large whole cloth quilt and thought that this might be a design I would like to use - the designs are all still evolving!!

I hope you will give my challenge on the SewCalGal 2013 FMQ Challenge a try, you might be pleasantly surprised with your results!

Thanks so much to SewCalGal!!
Have a great day and thanks so much for stopping by!
Related Posts Plugin for WordPress, Blogger...