Monday, October 31, 2011

Dresden Flimsy

I finished piecing the Dresden Plate quilt.


It is 95" square (couldn't find a big enough place to lay it out). I used a whole jelly roll with a few extra squares cut from the leftover fat quarters to make the borders (they are 8" wide).
Just need to buy some batting and backing fabric, then I can get started on the quilting.

Have a great day and thanks for stopping by!

Friday, October 28, 2011

A Winner and Borders

I used the RNG to select the winner of the book


and Carla was the lucky winner. Congratulations Carla!
Thank-you to everyone who entered and for all the kind comments!

I have been working on the border for the Dresden Plate quilt.


I had bought a jelly roll on sale last summer and thought it would be perfect for the border.


I cut the strips in half and pieced them together in groups of two


and then groups of four.


I then cut them into 2+1/2" segments (there is that handy tape trick again!)


I am randomly joining them all together.

Have a  great day and thanks for stopping by!

Thursday, October 27, 2011

Dresden Plates

I have been making Dresden Plates! The online information and videos for making them has been wonderful. They were much easier to make than I thought they would be.


I used the book and template by Anelia Belden (if you click on the "Google Preview" on the link you can view the book), but there are lots of similar templates out there. I decided to go with a template instead of a GO! die because I thought there would be less fabric waste (there was really very little).


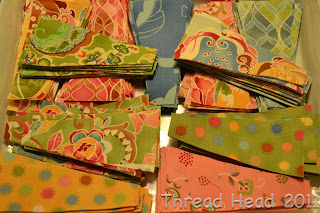
I used 4+1/2" strips of fabric and cut up 11 fat quarters in no time at all. The fabric is Boutique by Chez Moi.

I decided on the "peak top" for the dresden plate blades,


and chain pieced the the tops.


When I was preparing to sew the tops I finger pressed the centre


to make it easier to line up the centre when I pressed the point (I did trim the seam allowance at the point and pressed  the seam open).


The blades are sewn together starting at the end with the point. After it took a bit of fiddling to get the DP's to lay flat I realized that I had to sew a slightly wider seam allowance as I got closer to the centre when joining the blades. This seems to be a common problem even with the GO!.


I made the centers 2+1/4", using the freezer paper appliqué method (the stencil works great for appliqué circles).


I decided to appliqué the centres before appliquéing the Dresden Plates to the background square (easier to remove the freezer paper - I didn't want to have to cut the background square to remove the freezer paper).

I used a tiny zig-zag and 100WT thread.


It didn't take long to make the 25 DP's I needed.


Once again I used a tiny zig-zag and 100WT thread to stitch the DP's to the background square (I used a 14+1/2" square of ivory Kona cotton - finished size of 14").


I sewed the blocks together on point with setting triangles and corners (just because I preferred this look than to straight rows). The DP's are just over 10". I used large squares of fabric for the background because I wanted to have lots of room for quilting.
I am working on the border now.
The partially finished quilt top is in the spare bedroom, where I think the finished quilt will go. My oldest son told me it looked old - that is exactly what I wanted!

Have a great day and thanks for stopping by!

Tomorrow is the draw date for the book I am giving away.
Saturday, October 22, 2011

Friday Night Sew-In Results


 Stitched up 5 more Dresden Plates last night. They just need their centres appliquéd. I got all the remaining DP centres ready for appliqué too.


Had a pair of Blue Jays at the feeder today.

Have a great day and thanks for stopping by!


Don't forget to enter my giveaway.

Friday, October 21, 2011

400th Post!

I can't believe that this is my 400th post! 


I knew that it was coming and thought I should do something special. Then I remembered that I have this book that I am supposed to pass on, but with everything that happened this summer I had forgotten about it.


If you would like to be entered to win this charming book, just leave a comment on this post and I will use RNG to pick a winner next Friday (the 28th of October). I will ship internationally, and please  make sure
I have a way to reach you. 

Now to get ready for the Friday Night Sew-In! More Dresden Plates,


I have 14 so far and I need 25 (they are 10").

Have a great day and thanks for stopping by!


The winner of the book is Carla! Thanks to everyone who entered.

Monday, October 17, 2011

Dresden Plate Mini Quilt


I finished the Dresden Plate mini quilt (it is 16" square). I made it to hang on an old hanger,


in my mini quilt room (a.k.a. the laundry room). 


I densely quilted the background so that the Dresden plate would stand out (I used wool batting).

I tried the Hooked Feather for the background - 


marking the stem with a Hera Marker

The instructions in the Hooked Feather book say to stitch the stem first from the top down and stitch feathers on one side, stop and tie off the thread and start back down at the bottom. 


I chose to stitch one side of the feathers from the bottom along the marked line (barely visible). The hooks are made by stitching a small "c", touching the previous hook and stitching a large "C" back to the stem.


Next I stitched a few lobes at the top of the feather and then stitched down the stem marking.


I then stitched the "C"'s up the other side of the stem.

No backtracking and no starting and stopping.

I echoed around the feathers to make the rest of the filling stitches easier.


 The rest of the background I filled in by "bouncing" (off the feather, the dresden plate or the edge of the quilt). I use this technique lots when I just have small spaces to fill in.


I cut out lots of blades for a Dresden Plate quilt


The fabric is Boutique by Chez Moi. I had bought a fat quarter bundle of 12 different fabrics. My plan is to make up the Dresden plates and then decide what to make with them (I was inspired by Dresden Plate images from Google).


I have made 3 so far.

My husband took a picture when I was cutting out the DP blades. I am enjoying my new sewing room.


The little moccasins on the wall are ones I made when my oldest son (he is now 20) first started walking,


they seem so tiny now!

Have a great day and thanks for stopping by!

Saturday, October 15, 2011

Denise's Tip

I forgot to mention last week when I was adding the sashing to the Granny's Hankie quilt, that Denise suggested in her instructions to place masking tape on the underside of the ruler to help with cutting the strips.


This was a fantastic tip (I just had to draw an arrow on the ruler to make sure I aligned the fabric on the correct side of the tape!). I used 2 layers of tape just to be sure that there was enough of an edge to get caught on the end of the fabric.


I cut all the sashing much quicker than I normally would.
Thanks for the tip Denise!

Have a great day and thanks for stopping by!

Thursday, October 13, 2011

New Feathers


 I am trying a new type of feathers - Hooked Feathers (no backtracking).


 It is a pretty neat way to create feathers, but I am struggling with them (I keep wanting to create feathers the old way). I definitely need more practice before I quilt them on my next project.


 I would like to make a Dresden plate quilt, so I made a test block to try out the Dresden plate template.


It worked really well.
I have done some "walking-foot" quilting on it and I will try some hooked feathers in the background.


The full moon this morning.


A young robin came for a visit this afternoon.

Have a great day and thanks for stopping by!

Monday, October 10, 2011

Granny's Hankie BOM Sashing

This month for the Granny's Hankie BOM, the instructions are for the sashing. It was my goal for the holiday weekend (Happy Thanksgiving) to get the sashing all finished -

 And I did. I was worried about the colours before, and now I am very pleased with how it is turning out. It is 63" square so far. There are about 20" of borders to add over the next two months (I think it is a 12 month BOM).

I am now all caught up on BOM's, first time since June!

Since March, when I cut all these 3½"  tumblers (over 550 with the GO!) I have been using them as my "leaders and enders" when I sew. I am now over half way finished piecing the rows (23 in each row). It should be a lap quilt. The rows are about 55" long.

We put out the winter bird feeder this weekend and it has been fun to watch the birds (juncos, chickadees and sparrows).

Have a great day and thanks for stopping by!

Sunday, October 9, 2011

Hop to It BOM

I made the October Hop to It block (a few of us are making the blocks from Edyta Sitar's "Hop to It" book as a "block of the month" - please join us, it is a nice way to get the blocks made).


 Here are the 4 blocks we have made so far -


Reawyn (from lovetostitch) is picking out the next block, and will announce it at the beginning of November.


Some geraniums are blooming under my grow lights - 


Have a great day and thanks for stopping by!

Related Posts Plugin for WordPress, Blogger...