Showing posts with label Binding. Show all posts

Wednesday, April 6, 2011

THQA Quilt is Finished


My Thread Head Quilt Along quilt is all finished!!! I am so thrilled!
The quilt is 102" square, the blocks are 9". Good thing there is no sound with this picture, because my DH and #1DS are standing on high stools with their hands over their heads holding this giant quilt up!!

For those who have joined the quilt along - here are some details on how I quilted it.


All the quilting was done on my home sewing machine.
To begin with I used the walking foot to quilt diagonal lines through the black squares, this stabilized the quilt and it made quilting each block easier.
I started by quilting feathers in the parts of the alternating blocks that surrounded the blocks and then quilted each block with a different design (check out some of my older posts to see some blocks as I quilted them).

This block was quilted with a feathered wreath and I think that would have been a great design for all the blocks.


The alternating blocks all ended up looking like this (a design inspired by Carla Barrett - check out her gallery for other design inspiration).

The first border (the one that finishes the diamonds and includes part of the alternating blocks) was quilted with half feather wreaths (I used a Tupperware lid size "X" to mark the center vein).


The two little black borders have swirls quilted in them - also designed by Carla Barret (shown here).
The scrappy squares border was quilted with the walking foot to mimic the the large X's through the quilt.
There are little feathered wreaths in the outer corner blocks (I used the end of the Aurifil thread to mark those).

I used Aurifil #50 for all the quilting (top and bobbin) and a #80 Microtex needle. I used black for the walking foot quilting and the little black borders, but one neutral colour for the rest of the quilting (I didn't want to keep changing thread to match - used a 1300m spool of thread!). The batting is wool (I needed a King Size).
I used my regular set-up for machine quilting and it turned out that is was easier to quilt than I thought it would be.

Here are the links for my free motion feather tutorial (the one with the video) and feathers part II (shows feathered wreaths)

Here is a link for my binding tutorial.

I had been collecting the fabric for this style of quilt for a while and the whole process of making it was much more fun because other people joined me! Thank-you!!!

You still have lots of time to participate in my challenge to finish something with the blocks, so I hope you will send in some pictures (until the end of May 2011).

Now to find a place to store my quilt - it is too big for our double bed (maybe one day we will graduate to a "grown-up" queen size bed! - we will be ready with a quilt LOL).

Have a great day and thanks for stopping by!!

Sunday, February 27, 2011

Great Day!

I had such a wonderful day! I was invited by Myra to join her at a mini retreat for one of her quilt groups. I have never quilted with a group - what a fantastic way to spend the day! I met some lovely, talented ladies and I hope to be invited again (hint, hint).

I didn't take any pictures, but Myra took pictures of some of the quilts, so hopefully she will post them. She did!

I was lucky enough to win a door prize - a 4" squares pack (I don't what they are called). I think I will make some disappearing nine-patch blocks.

I managed to finish sewing the binding on D's Quilt (more about it tomorrow, after I sew on the label and it is officially finished).

It is so lovely to put faces to names of people I have met through blogging! Thank-you so much for inviting me Myra!!

Last week I was asked to volunteer in my youngest son's class. They were working on hydraulics. Pamela (The Long Way Around) posted her daughter's groups creation. There are 5 girls and 20 boys in the class - and the girls had the most artistically creative project! Helping in the class was another great way to spend the day!

Have a great day and thanks for stopping by!!♥

Saturday, February 26, 2011

Binding Tutorial

I have been asked to post a tutorial on how I attach binding on a quilt (I am self taught and this is what works for me).

This method results in a binding where the beginning/end is the same as the other joins in the binding.

I start with 2½" strips of binding fabric (sometimes 2¼" strips for a wall hanging or table runner). I cut the strips across the width of the fabric and join them by piecing them at right angles and stitching on the bias (as shown in picture). Trim the seam to ¼".

Press the seams to one side and press the whole strip in half down the middle.

Thanks to Myra, I now wrap by binding around a ruler when it is all ready -

It is a great way to store the binding until you are ready to attach it (I like to get the binding all ready as soon as I finish a quilt top, while the machine has the right colour thread, and so I don't accidentally use the fabric elsewhere).

I roughly lay out the binding on the quilt to make sure that none of the joins in the binding will be at the corners of the quilt. I put a pin where I want to start sewing the binding - leaving about a 12" tail on the binding before stitching. Back stitch a bit at the beginning.

I sew the binding with a walking foot and a ¼" seam. I move the needle over and use the edge of the foot as a guide. I don't cut the batting and backing before attaching the binding - I find that the layers tend to lay flatter and I have better control over the quilt this way.

When approaching a corner -

stitch to ¼" from the end, stop with the needle in the down position,

turn the quilt,

back stitch to the edge of the quilt, stop with the needle in the down position. Do not cut the threads as this will cause problems later on. No need to remove the quilt from the machine to make the fold, just lift the presser foot up. This works because I haven't trimmed the backing and batting.

The next few steps are hard to explain, just make a neat fold with a 45° angle.


Fold the binding so that the edge of the binding lines up with the edge of the quilt


The opposite side of the binding looks like this, with the folded edge even, there is a 45° angle underneath,

and a fold parallel to the back edge of the quilt.

Keep stitching the binding down all away around the quilt. Stop about 12" from where you started sewing the binding (so there is a gap). Back stitch here also. Remove the quilt from the machine and lay the edge on a flat surface.

Fold one side of the binding up at a 45° angle and the other end of the binding down at a 45° angle.

Leaving a slight gap, finger press the binding (I placed a sheet of paper behind to make it easy to see, but it is laying flat on the quilt), place pins through one layer, on both ends of the binding fabric to mark the fold.

Lift up the binding and unfold, line up the pins. The binding ends are at right angles to each other.

Place pins on the finger pressed lines, making sure the pins are on either side of the center fold, this will eventually be the stitched line.

Refold the binding and lay the binding down on the quilt to make sure that the fabric will be stitched in the right direction and that the binding is the right length. Adjustments can be made to shorten or lengthen the binding at this point.

When you are satisfied with the length, stitch the binding join where the pins are.

Double check to make sure the binding will lay flat and that it is the right length before cutting the ends of the binding. Unpick and redo if necessary - gets better with practice.

Carefully trim the ends of the binding to ¼".

Press the seams to one side and refold the binding and press (not on the quilt but on the ironing board).

Stitch the rest of the binding down. This join is nice and smooth with no extra bulk, and all the joins are identical.

This technique also works on small quilts (mug rugs ...), it is just a bit more fiddly with a smaller gap, I make sure to start just before a corner and end just after a corner.

Trim the backing and batting, leaving a ¼" seam allowance. If the batting is thin, I sometimes leave a slightly larger seam allowance on a large quilt, the batting on this one is wool and thick, so I left ¼".

When I am trimming by the corner, I fold the binding out of the way before carefully trimming so that I don't accidentally cut the edge of the binding.

I hand stitch the binding down on the back of the quilt with a small invisible stitch, using thread that matches the binding. I don't use pins or clips to hold the binding down, I just fold and hold the binding as I stitch.

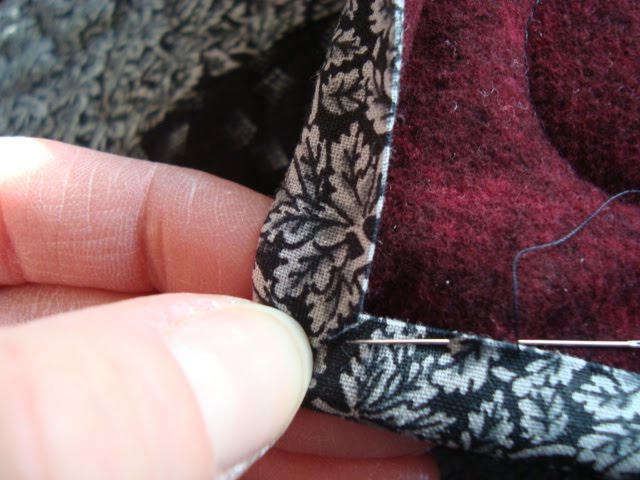
When you get to the corner, fold the edge over all the way to the end and then

fold the other side over to get a nice, crisp corner.

I take a couple stitches on the edge of the miter (only on the back, not on the front), and continue down the edge.

I hope this all makes sense! Sorry about the fabric for this tutorial, it would have been better to have a contrasting binding, this is just the quilt that I was working on when I was asked to make a tutorial.

Have a great day and thanks for stopping by!!
Related Posts Plugin for WordPress, Blogger...