Tuesday, July 31, 2012
July's FMQ Challenge
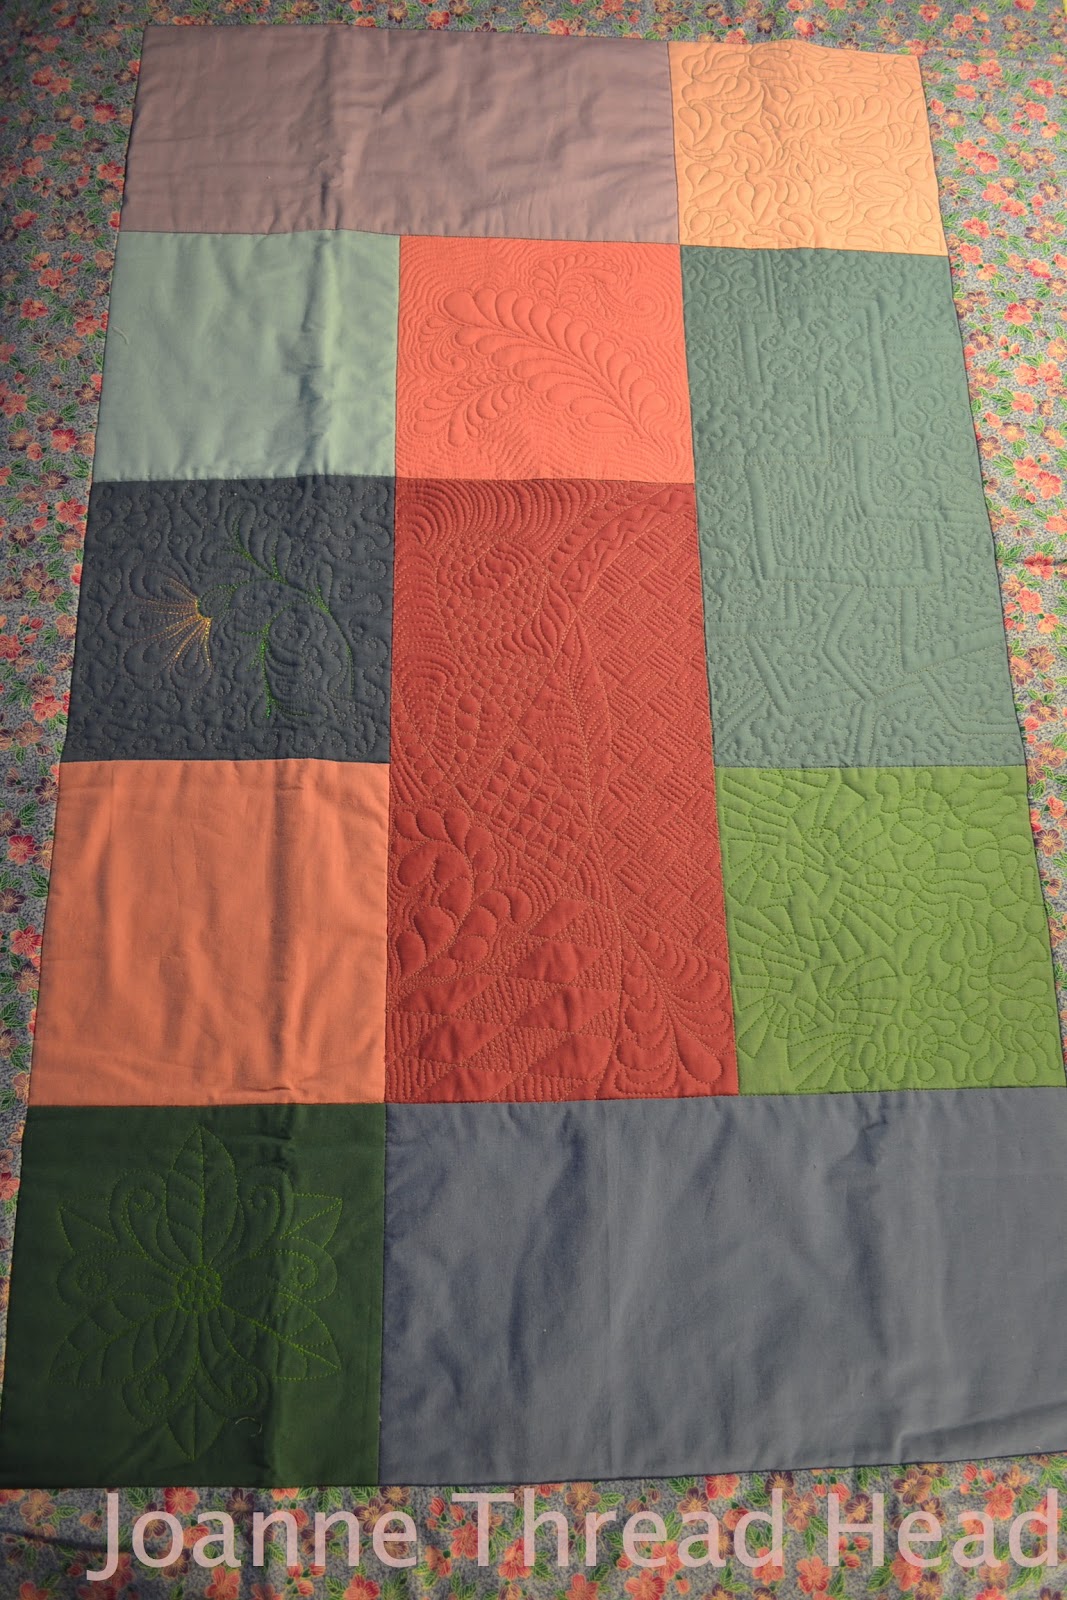
I finally got around to this month's Free Motion Quilting Challenge (nothing like waiting until the last moment - I did finish it yesterday though!).
I really liked this month's design from Angela Walters.
Half of the 8" x 16" block on my sampler quilt I filled the tiles with different fillers,
the other half I tried irregular tiles and the same fillers.
This is my sampler quilt to far. Hard to believe that there are only 5 more areas to quilt. It has been a fabulous challenge - thanks SewCalGal!!
I have always had bobbin tension problems when quilting - when the bobbin starts to get low on thread, and I quilt too fast. It was recommended that I try a "Single Hole Throat Plate" on my sewing machine. I can't believe the difference it has made. I have quilted a few quilts recently with no tension problems. I have been using it for piecing too, with success. I highly recommend it, if you can get one for your machine.
Thanks for stopping by and have a great day!❤
Thursday, July 26, 2012
RPTPP Baby Quilt
I recently made a baby quilt for a work colleague of my husband, and thought that I would share my pattern. The quilt is 35" x 49".
I made it with the Rob Peter to Pay Paul GO! die (one of my favourite GO! dies, it is so versatile). The blocks are 7".
I used -
1.5 m (~60") fabric for the centres of the block
1m (~40") each of two different fabrics for the outside pieces of the block, plus I used another 0.5m (~20") of one of the fabrics for the binding
1.5 m (~60") flannel for the backing
batting (I used cotton - tried Hobbs Heirloom Bleached for the first time, it is lovely and soft. Thanks for the tip Corina.)
I made 35 blocks, with a 5 x 7 block layout. This way the colours balanced.
The above photo shows how I pressed the seams. I don't use pins when I make this block, but use this method (if the link doesn't work, it is how to piece curves with a regular pressor foot and lifting the top piece up), with the centre piece on the bottom, and starting with the outer piece laying about 1/4" beyond the tip of the centre piece.
I quilted it on my DSM.
This seems to be my favourite design to quilt on RPTPP quilts, as I use it every time!
I used an open heart feather design in the oval shapes, and continuous squiggly loops for the centres.
You can kind of see the quilting on the back.
I used Aurifil #50 thread for the quilting (and piecing) - variegated pale yellow for the centres and variegated pale green for the oval shapes (I had the same thread top and bottom), with a #80 Titanium needle (just seems to be the needle that is constantly in my machine at the moment - it is lasting a long time).
Have a great day and thanks for stopping by!❤
I made it with the Rob Peter to Pay Paul GO! die (one of my favourite GO! dies, it is so versatile). The blocks are 7".
I used -
1.5 m (~60") fabric for the centres of the block
1m (~40") each of two different fabrics for the outside pieces of the block, plus I used another 0.5m (~20") of one of the fabrics for the binding
1.5 m (~60") flannel for the backing
batting (I used cotton - tried Hobbs Heirloom Bleached for the first time, it is lovely and soft. Thanks for the tip Corina.)
I made 35 blocks, with a 5 x 7 block layout. This way the colours balanced.
The above photo shows how I pressed the seams. I don't use pins when I make this block, but use this method (if the link doesn't work, it is how to piece curves with a regular pressor foot and lifting the top piece up), with the centre piece on the bottom, and starting with the outer piece laying about 1/4" beyond the tip of the centre piece.
I quilted it on my DSM.
This seems to be my favourite design to quilt on RPTPP quilts, as I use it every time!
I used an open heart feather design in the oval shapes, and continuous squiggly loops for the centres.
You can kind of see the quilting on the back.
I used Aurifil #50 thread for the quilting (and piecing) - variegated pale yellow for the centres and variegated pale green for the oval shapes (I had the same thread top and bottom), with a #80 Titanium needle (just seems to be the needle that is constantly in my machine at the moment - it is lasting a long time).
Have a great day and thanks for stopping by!❤
Saturday, July 21, 2012
72 Shades of Red
I had been wanting to try some English paper piecing - I thought it would be nice to have a hand sewing project. I helped my mother and sister make a grandmother's flower garden quilt many years ago.
I ordered the GO! Hexagon die. I thought I could use it for cutting out fabric to machine piece, or to cut out paper for hand piecing.
The same day the die arrived, I received this English Paper Piecing kit from Sew What, a new local business (I had answered a survey and this was my free gift - thank-you so much Heather and Preston! And good luck with your business).
So I tried both the card stock hexagons and small paper hexagons (1" sides) that I cut with the GO! to make the hexagons.
I decided to just make a small mug rug to see how it works. I thought I would cut out one hexagon from all the red fabrics I have - I was surprised that I had 72! Some of them were just little scraps. The mug rug ended up being 14.5" x 25".
I used a small zig-zag stitch and 100 weight fine thread to appliqué the pieced hexagons to a larger piece of fabric. I used two layers of cotton batting (because I didn't have the heat resistant, foil batting). I added the binding before quilting the feather border, so that the quilting would be even on the edge. I don't cut the extra batting and backing off before I bind a quilt, so I still have some place to hold when I am quilting.
I quilted a small meander over the hexagons, and "bump-bump" feathers in the border. The quilting is with the same 100 weight thread, and a #80 Titanium needle.
It came out to a nice size for my coffee table trunk.
It was lovely to hand sew the hexagons and I see more hexagons in my future.
Recently I was contacted by Jessi (Joy Unspeakable) because she was making my clothes pin bag pattern, and had some question. Well, she finished the bag, all stitched by hand, and did such a lovely job - she shows it here. Be sure to check out her blog - she lives in Kenya as a missionary, and has a very interesting life.
Ruth (Country Log Cabin) also sent me some pictures of her Thread Head Quilt Along quilt, her 50th Anniversary quilt shown here. She did a great job too!
It is so nice for me to see the projects that people have made with my patterns. Thanks!!
Thanks for stopping by and have a great day!
I ordered the GO! Hexagon die. I thought I could use it for cutting out fabric to machine piece, or to cut out paper for hand piecing.
The same day the die arrived, I received this English Paper Piecing kit from Sew What, a new local business (I had answered a survey and this was my free gift - thank-you so much Heather and Preston! And good luck with your business).
So I tried both the card stock hexagons and small paper hexagons (1" sides) that I cut with the GO! to make the hexagons.
I decided to just make a small mug rug to see how it works. I thought I would cut out one hexagon from all the red fabrics I have - I was surprised that I had 72! Some of them were just little scraps. The mug rug ended up being 14.5" x 25".
I used a small zig-zag stitch and 100 weight fine thread to appliqué the pieced hexagons to a larger piece of fabric. I used two layers of cotton batting (because I didn't have the heat resistant, foil batting). I added the binding before quilting the feather border, so that the quilting would be even on the edge. I don't cut the extra batting and backing off before I bind a quilt, so I still have some place to hold when I am quilting.
I quilted a small meander over the hexagons, and "bump-bump" feathers in the border. The quilting is with the same 100 weight thread, and a #80 Titanium needle.
It came out to a nice size for my coffee table trunk.
It was lovely to hand sew the hexagons and I see more hexagons in my future.
Recently I was contacted by Jessi (Joy Unspeakable) because she was making my clothes pin bag pattern, and had some question. Well, she finished the bag, all stitched by hand, and did such a lovely job - she shows it here. Be sure to check out her blog - she lives in Kenya as a missionary, and has a very interesting life.
Ruth (Country Log Cabin) also sent me some pictures of her Thread Head Quilt Along quilt, her 50th Anniversary quilt shown here. She did a great job too!
It is so nice for me to see the projects that people have made with my patterns. Thanks!!
Thanks for stopping by and have a great day!
Friday, July 20, 2012
July Catch Up
For the past month we have been doing some yard work.
We had a small deck on the back of the house, that with the table set up you couldn't walk around. We have been wanting to change it ever since we moved here, and this was the summer.
We added a brick patio and a smaller, maintenance free/composite deck (for the BBQ and the stairs from the house). We did the work ourselves, everyone had their jobs and it worked out so well.
With the gazebo, it is a much nicer place to sit, and lots of room.
I have been doing some sewing. I will be showing the finished projects soon.
I ordered a sewing machine cabinet last month, and have been patiently waiting for its arrival. At the beginning of the week I gave my sewing area a good clean, and got it ready for the expected delivery date.
I finally had to break down and set up a make shift sewing table, as some how the cabinet got lost! Fingers crossed it will come next week.
Have a great day and thanks for stopping by!❤
| Before |
We had a small deck on the back of the house, that with the table set up you couldn't walk around. We have been wanting to change it ever since we moved here, and this was the summer.
| After |
We added a brick patio and a smaller, maintenance free/composite deck (for the BBQ and the stairs from the house). We did the work ourselves, everyone had their jobs and it worked out so well.
With the gazebo, it is a much nicer place to sit, and lots of room.
| the rest of the back yard |
| vegetable garden |
| front flower bed |
| we made this garden bigger this year, just to give the perennials room to grow |
| and the side |
I have been doing some sewing. I will be showing the finished projects soon.
I ordered a sewing machine cabinet last month, and have been patiently waiting for its arrival. At the beginning of the week I gave my sewing area a good clean, and got it ready for the expected delivery date.
I finally had to break down and set up a make shift sewing table, as some how the cabinet got lost! Fingers crossed it will come next week.
Have a great day and thanks for stopping by!❤
Saturday, July 14, 2012
Friday Night Sew In Results
Another successful Friday Night Sew In!
I machine quilted some hooked feathers for my Mother,
in the border of this little quilt she made.
It is a thimble quilt - the pieces are about an 1". She had stippled the centre, but didn't feel up to feathers yet.
I had to keep a timer near by so that I wouldn't get carried away with sewing,
and forget to move the sprinkler. We are trying to grow grass and sod in +30C temperatures, and it takes a lot of water.
I did sew together some hour glass blocks too (I had made the blocks a while ago).
They are for the sashing of the Hop to It quilt (from the book by Edyta Sitar, I finished the last block this week).
I didn't know if I would like the sashing, but I now think it will be OK.
Thanks for stopping by and have a great day!❤
I machine quilted some hooked feathers for my Mother,
in the border of this little quilt she made.
It is a thimble quilt - the pieces are about an 1". She had stippled the centre, but didn't feel up to feathers yet.
I had to keep a timer near by so that I wouldn't get carried away with sewing,
and forget to move the sprinkler. We are trying to grow grass and sod in +30C temperatures, and it takes a lot of water.
I did sew together some hour glass blocks too (I had made the blocks a while ago).
They are for the sashing of the Hop to It quilt (from the book by Edyta Sitar, I finished the last block this week).
I didn't know if I would like the sashing, but I now think it will be OK.
Thanks for stopping by and have a great day!❤
Saturday, June 30, 2012
June's FMQ Challenge
I managed to get this month's free motion quilting done before the end of the month!! The month went fast!
I filled in an 8" x 16" rectangle on my sample quilt. I thought this month's challenge was wonderful, and Cindy Needham's tutorial was fabulous.
I started by marking a few lines with a Hera marker,
and then filled it in with all kinds of quilting.
Thanks to Sew Cal Gal and Cindy Needham!!
This past week has been taken up with installing a new patio, but luckily for me today was 30C/86F and too hot to work outside in the afternoon (the patio faces west and gets all the afternoon sun), so I was able to do some quilting.
Thanks for stopping by and have a great day!❤
I filled in an 8" x 16" rectangle on my sample quilt. I thought this month's challenge was wonderful, and Cindy Needham's tutorial was fabulous.
I started by marking a few lines with a Hera marker,
and then filled it in with all kinds of quilting.
Thanks to Sew Cal Gal and Cindy Needham!!
This past week has been taken up with installing a new patio, but luckily for me today was 30C/86F and too hot to work outside in the afternoon (the patio faces west and gets all the afternoon sun), so I was able to do some quilting.
Thanks for stopping by and have a great day!❤
Friday, June 22, 2012
Winding Ways
This week has gone by fast. I have been doing a lot of yard work now that things are drying out. Plus my youngest son finished school for the summer! Whoo Hoo!
I have sewn more Winding Ways blocks (they were cut with the GO! cutter). I have now finished the length of the quilt and just have to add 4+1/2 more rows to make the quilt top square - it will be about 94" square when done. I am amazed at how well the pieces go together, and it has been lovely to sew. Not much pre-planning has gone into the layout and I hope that the rest of the pieces work out into a nice pattern.
I have had a little house guest for the past two weeks and she has been a great companion while I sew. She is off home tomorrow, a week ahead of schedule (her "parents" miss their three dogs too much and are coming home early), I am sure she will be thrilled to go home to see her family again. She is a lovely Kerry Blue terrier.
Have a great day and thanks for stopping by!❤
I have sewn more Winding Ways blocks (they were cut with the GO! cutter). I have now finished the length of the quilt and just have to add 4+1/2 more rows to make the quilt top square - it will be about 94" square when done. I am amazed at how well the pieces go together, and it has been lovely to sew. Not much pre-planning has gone into the layout and I hope that the rest of the pieces work out into a nice pattern.
I have had a little house guest for the past two weeks and she has been a great companion while I sew. She is off home tomorrow, a week ahead of schedule (her "parents" miss their three dogs too much and are coming home early), I am sure she will be thrilled to go home to see her family again. She is a lovely Kerry Blue terrier.
Have a great day and thanks for stopping by!❤
Sunday, June 17, 2012
March's Small Quilt
I finished another Small Quilt of the Month from the Yahoo Small Quilt Talk Group.
This is March's quilt (I joined the group in April and have one more quilt to catch up). It is Civil War Baskets from the book "Remembering Adelia" by Kathleen Tracy
I used reproduction fabric that my husband bought me when he was in California last year. I wanted to try a very monochromatic quilt with just a splash of colour (red - my favourite colour), and I am pleased with how it turned out. I have said it before - mini quilts are a great place to try something new.
I used a Hera marker to mark quilt lines. I thought the above picture shows how well the marker works - it just makes an indentation in the fabric and doesn't leave any thing that needs to be removed later (the fabric fibres will bounce back after a while if the marks aren't covered by stitching). The Hera marker is probably what I use the most to mark quilting designs, especially since it works on every colour of fabric.
After quilting the lines (the above 2 photos are closer to the actual colours of the fabrics of the quilt).
I added some micro stippling around the baskets, and like the contrast with the cross lines in the basket handle area (thanks for the tip Wendy!).
This quilt was all about Hooked Feathers - they are in the basket and the border.
The sashing idea came from Janet (Cariboo Crossing Chronicles - such a lovely blog!) when she sent me a link to her Friendship Mini Sampler Quilt - thanks Janet!
A close up of the back of the quilt showing the hooked feathers border (more about hooked feathers on later post). I made the borders extra wide so that I would have lots of room for quilting.
The quilt is 19" square. I used wool batting, and 100 weight thread for the quilting.
Thanks for stopping by and have a great day!❤
This is March's quilt (I joined the group in April and have one more quilt to catch up). It is Civil War Baskets from the book "Remembering Adelia" by Kathleen Tracy
I used reproduction fabric that my husband bought me when he was in California last year. I wanted to try a very monochromatic quilt with just a splash of colour (red - my favourite colour), and I am pleased with how it turned out. I have said it before - mini quilts are a great place to try something new.
I used a Hera marker to mark quilt lines. I thought the above picture shows how well the marker works - it just makes an indentation in the fabric and doesn't leave any thing that needs to be removed later (the fabric fibres will bounce back after a while if the marks aren't covered by stitching). The Hera marker is probably what I use the most to mark quilting designs, especially since it works on every colour of fabric.
After quilting the lines (the above 2 photos are closer to the actual colours of the fabrics of the quilt).
I added some micro stippling around the baskets, and like the contrast with the cross lines in the basket handle area (thanks for the tip Wendy!).
This quilt was all about Hooked Feathers - they are in the basket and the border.
The sashing idea came from Janet (Cariboo Crossing Chronicles - such a lovely blog!) when she sent me a link to her Friendship Mini Sampler Quilt - thanks Janet!
A close up of the back of the quilt showing the hooked feathers border (more about hooked feathers on later post). I made the borders extra wide so that I would have lots of room for quilting.
The quilt is 19" square. I used wool batting, and 100 weight thread for the quilting.
Thanks for stopping by and have a great day!❤
Saturday, June 16, 2012
Friday Night Sew In Results
I had a great Friday night!
Skypeing and sewing with friends - Joan (at Leschenault) and Raewyn (lovetostitch).
I had a little buddy to keep me company too (we are looking after a friends dog for three weeks).
My Friday night started with some chores - surprisingly my fancy iron does more than just quilting projects!
My main Friday night project was working on this mini quilt (it is the March small quilt for the Yahoo Small Quilt Talk Group). I added the borders last night and got started on the machine quilting. I stitched in the ditch with the walking foot first and then did some free motion quilting. I should get the quilt finished this weekend.
Thanks Heidi and Bobbi for another great night!
Thanks for stopping by and have a great day!❤
Skypeing and sewing with friends - Joan (at Leschenault) and Raewyn (lovetostitch).
I had a little buddy to keep me company too (we are looking after a friends dog for three weeks).
My Friday night started with some chores - surprisingly my fancy iron does more than just quilting projects!
My main Friday night project was working on this mini quilt (it is the March small quilt for the Yahoo Small Quilt Talk Group). I added the borders last night and got started on the machine quilting. I stitched in the ditch with the walking foot first and then did some free motion quilting. I should get the quilt finished this weekend.
Thanks Heidi and Bobbi for another great night!
Thanks for stopping by and have a great day!❤
Subscribe to:
Posts (Atom)