Showing posts with label Dyeing. Show all posts

Sunday, June 29, 2025

Week 26 of 2025

This week I dyed some fibre in preparation for Tour de Fleece (starts July 5th this year) -

The bottom two are BFL dyed in two different colour ways to be spun together, and the top fibre is some leftover Merino.

Photos from Around -

The vegetable garden.
My son brought home so many different annual flowers (I don't usually plant too many varieties), the yard is full of colour now. These are just some of the different petunias.
Beautiful metallic Dogbane beetles on some wildflowers.
Poor Molly had to suffer through some grooming - she is clean, with short nails now.
Happy hens!
The canola field surrounding our home is stunning.
32ºC yesterday and GingerSnap! was hot. He was inside most of the day, but loves it outside.
The chicks have really changed this week - they are two and half weeks old.
Miss Maggie is smart to stay inside when it is hot.
Spot those German Shepard ears! Molly lays down and waits for someone to throw her ball, but we have to find it first.

All the best!♥︎

Tuesday, January 12, 2021

Some Dyeing

This past week I did some dyeing-


This is all a Blue Faced Leicester and nylon blend for socks.


This is the first bundle that I decided to spin - I tried some different colours for this one, and wanted to see how it would spin (I used Jacquard acid dyes in the colours Russet, Teal and Golden Yellow mixed with a bit of of Jet Black to make lime green).

The three bobbins ready for plying (I like a 3-ply yarn for socks).
The finished yarn.
I really like how the colours came out.
And this is how it is knitting up (toe-up, two-at-a-time socks, with 56 stitches, on 2.75mm needles).
The colours on the fibre seemed so bright, but they really muted down after spinning - the colours are on opposite sides of the colour wheel.


I am almost half way through my weaving project - #4 out of 9 towels, each one is a different yarn colour so far, and then I will make some with stripes.

Photos from Around
Look away Mom!

The cat brought a live mouse in the house for the first time.
My son took this picture - I was up on the counter texting my husband that we would have to move.
We eventually got it to leave the house. The cat isn't too fond of mice she prefers voles.
My oldest son finally received all the parts he needed for a new project for his business,
and this is the main part - a laser.
This will all be a CNC laser cutter for wood, leather, plastic etc.

All the best!♥︎

Tuesday, September 10, 2019

Late Blooms

This past week involved more canning of apple products, and house renovations - both are nearing the end for this year!


I did dye up some fibre and yarn for a 'spin your most precious fibre' challenge on Ravelry. The yarn is silk gima - a ribbon type yarn, and the fibre is a silk and linen blend - both were purchased last year  from the Silk Weaving Studio in Vancouver.


They came out exactly how I had hoped (I was a bit worried about dyeing them because I find that blended colours tend to split on silk). I dyed them with Jacquard Acid dyes in the colour ways Sun Yellow with a bit of Jet Black (to make the khaki green), Pink, Lilac and a bit of Grey over the whole thing to tone it all down. The plan is to make a shawl with the two yarns.


The gray sweater is progressing nicely.

Fall is around the corner (it was 3ºC the other night!), and lots of flowers have started blooming-
Sedum
Cornflower blooming again
Big Bluestem - a prairie grass
This is a perennial from here that I didn't know what it is until it started to bloom - an Obedient Plant.
This plant is a perennial from here that I still can't figure out what it is (the last one) - it is kind of like a mint (square-ish stem, serrated leaves on alternating on opposite sides of the stem...), but it doesn't smell. I was hoping that it would bloom so I could figure it out. In the spring I moved perennials from an overgrown, weedy flower bed, so maybe it is a weed (I moved plants that had dug-out sections next to them, assuming the previous owners only took some of the good plants. It has been fun trying to figure them out - there is a great selection of 'new-to-me' flowers).

Some photos from around-
 This Morning Glory was blooming late in the day in a weedy section of the yard.
  Out for an evening walk.
 The oldest grain bin is getting a new roof.

All the best!♥︎

Tuesday, September 3, 2019

More Indigo Dyeing and Canning

This past week my sister came over to try out indigo dyeing (I guess I think everyone should see how interesting it is).


This time we used the indigo kit from Jacquard. It worked really well - created that nice dark blue I was hoping for the last time I dyed with indigo.


I sewed a top with one of the pieces of fabric (the pattern is the Bondi Top by Sew to Grow - it was harder to sew than I thought it should have been, but it is comfy and I like the fabric. I had to add some pleats at the neck because it was so big).

I also finished spinning a project that I started spinning in July during Tour de Fleece.


This is from a local raw fleece that I had processed and dyed. Ended up with over half a kilo, and over 2000 metres of about Sport/DK weight yarn.


I started knitting the Autumn League Pullover, a free pattern by Alexandra Tavel.


Canned Apple Pie Filling -

We have been making canned apple pie filling this week (this is the first time we have had apple trees so we are trying every way to preserve apples) and I wanted to share my experience. I am really pleased with the results.

the first two batches
I used the recipe from a canning magazine I had bought at the beginning of summer, but here is a link to the same recipe with lots of helpful tips
The recipe calls for ClearJel (a modified corn starch) as a thickener. I couldn't find it anywhere in Winnipeg (a large city) so I ordered it online from Ontario. I had read a lot about thickeners while I was searching out the product and apparently you can't substitute regular, ie. easy to find, thickener because they don't withstand the canning process. I also read that some people didn't add a thickener when canning apple pie filling, just used their regular thickener when they baked a pie. We have been canning all kinds of apple products, Maple Apple Butter is delicious, as well canned apples in light syrup, the canned apples just floated, so I don't think making apple pie filling without a thickener would work as well.

Since my package of ClearJel was only enough for a couple of batches of pie filling we decided to see if we could find the product locally and decided to try the nearby smaller towns, with better luck. Prairie Foods in Plum Coulee had Thermo Flo - a different brand of modified corn starch. I used the same amount of starch for the latest batch of pie filling and it didn't seem as "gloopy" as the ClearJel, but thickened nicely (there isn't much online about Thermo Flo, ClearJel seems to be the popular one).
After the first batch we have been experimenting with the recipe a bit each time, it was a bit too sweet with lots of 'sauce' - we are up to 16 cups of sliced apples instead of 12, a bit less sugar and an extra 1/2 cup of water. We do leave a good 1" of headspace (up to where the jars start curving in) when filling the jars, and leave the jars in the canner (regular water bath canner), off the heat, for 10 minutes, to minimize siphoning.


A jar from the first batch on the left (without the ring) and the latest batch (first with the thermo Flo) fresh from the canner on the right (with the ring) - a better fruit to 'sauce' ratio for us.

Photos from Around-

 Swallows on the wire.
 Our first ever homegrown watermelon - tiny but so delicious!
We thought it was funny that our oldest was so surprised that there were so many seeds - he has only had seedless, and we remembered why we only ate watermelon outside when we were young.
Surprised by a couple of deer on our walk.

All the best!♥︎

Tuesday, August 13, 2019

Dyeing with Indigo

This past week I tried indigo dyeing for the first time (and then had to dye more on the weekend to show the rest of my family how fascinating it is).
I used a dye kit from Maiwa, that I had bought a while ago at a local fibre fest (they no longer seem to sell the one I have on the website, it contains lye instead of calcium hydroxide). I followed the instructions included in the kit (and available on the Maiwa website - link for the instruction pdf sheet).

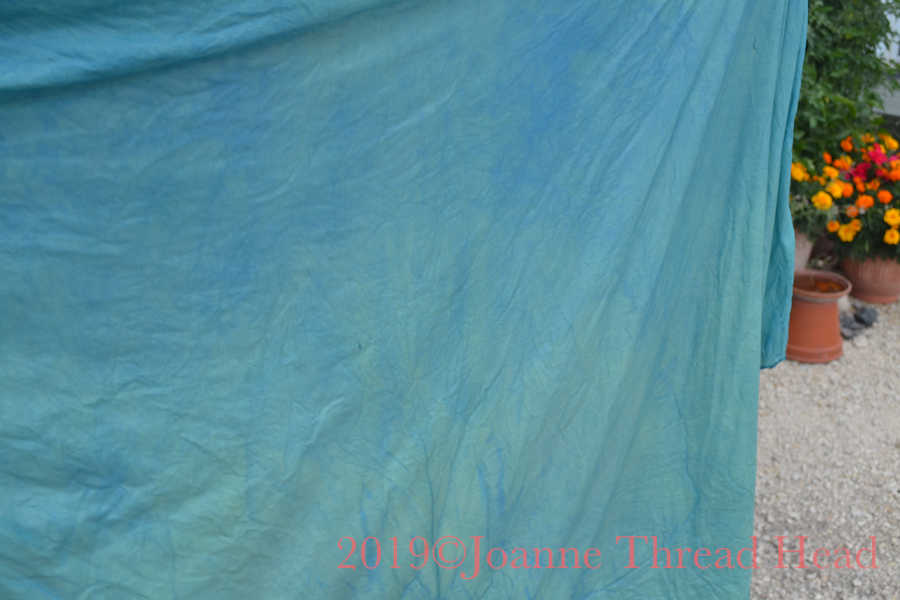
I dyed some white and natural cotton fabric, as well as some natural commercial linen/cotton yarn and handspun wool yarn. The indigo vat is green in colour when starting to dye (there is a whole chemical process that I don't fully understand).

The fabric (or yarn) first comes out of the vat bright green,
 and as it touches the air it slowly turns blue
 After about 20 minutes it was fully blue.
I tied and dipped the large piece a few times.
This smaller piece was just scrunched and dipped once (for about 30 minutes).
The yarn was dipped a few times (each about 30 minutes with 30 minutes hanging time in between).
 These are the t-shirts my family dyed on the weekend.

I want to experiment more with indigo dyeing, I would like to try shibori next.

With the smaller piece of fabric (this was natural cotton, dipped once) I sewed a top.


I started with the Ashton Top pattern from Helen's Closet  that I made a couple of weeks ago and heavily modified it.
I made my first top following the size 8 pattern just to see how it fit because I knew that I wanted to experiment with the pattern. Although the pattern comes in various sizes and also a couple of cup sizes, the larger cup size didn't start until size 12, so I needed to modify the darts for myself. For this top I decided to also angle the darts down to remove some of the fabric at my waist and make the top look less like a maternity top on me - I am really happy with how this came out - thrilled that it worked!

"all mine"
I can't seem to put anything on the floor without Maggie coming to see what's happening, but in this photo you can see the dart better. I also opened up the neckline and moved the straps over for a better fit (I have wide shoulders). I made the hemline longer in the back and front, and high at the hips (this allowed the top to be longer and narrow, and still fit over my hips).


I modified the straps and back (I had seen a similar top online). I used bias binding for all the finishing, even the hem (made from coordinating Bali fabric).


I also sewed another Helen's Closet pattern - the Blackwood Cardigan (I sewed one last week too with my Mom, but forgot to take a picture before she went home). This cardigan is my favourite for the summer - I have made 7 so far! Four for myself and three for my Mother (most from remnants of fabric, and one from an old knit sheet no one liked). It has become very quick to sew.

Photos from around the farm-

Backyard full of Cowbirds
 A family of Grey Partridges in the flower bed,
 15 all together!
 A Datura that self seeded blooming
A Bee on a Sunflower (the plants are about 7' tall)
 A Monarch butterfly on a Blazing Star

All the best!♥︎
Related Posts Plugin for WordPress, Blogger...