Showing posts with label Wall Hanging. Show all posts

Tuesday, January 21, 2020

Sunrise, Sunset

Sunrise-


Sunset-


Today I sewed while waiting for varnish to dry on the baseboards-


Hand sewing on the wall hanging-


Another sunrise picture because I couldn't resist-


 All the best!♥︎

Monday, January 20, 2020

Sewing Fun

Today I was painting doors.


But at least I got to sew while waiting for paint to dry.


I quilted one of the wall hanging layers,


and started making holes in the other layer.

Photos from around-

 My son made a track for the puppy to have a run (she loves it).
 The hard packed snow looks and sounds like styrofoam.
Blowing snow at sunset.
Windy and cold.

All the best!♥︎

Sunday, January 19, 2020

Another Quilt!

This year I wanted to try to get back into blogging - it's been wonderful. I am remembering all the things I like about blogs, and why I got started. The one thing I forgot was how inspirational they are. I thought this year I wouldn't start any new quilting projects, but reading blogs and seeing so many beautiful things, I just couldn't resist!


This is the start of a wall hanging that I saw on a blog tutorial. Should just be a quick project and then I will get back to my other works-in-progress.... Squirrel!

Photos from around-

I did some more tiling this weekend - the bathroom backsplash (I had ran out of tiles when I tiled around the bath tub). Also the mirror went up, the bath tub taps are in, and the door mouldings were installed. I am so pleased that it is coming together.
There are large snow drifts after yesterday's storm. 
Molly loves to dig in the snow.
Her coat is getting small, but it still works.

All the best!♥︎

Wednesday, May 29, 2013

Still Here

At the beginning of May I went to a quilt show in Morden (Sorry I no longer show quilt show pictures on my blog because of Pinterest - even though I ask people not to pin them, they still do. I feel it is wrong, because it is not my work. It is a shame because there were some amazing quilts! And great ideas - a couple of quilt tops were dyed after piecing to make the fabric more coordinated - a great way to use mismatched scraps - I see this one in my future.) There are a couple of photos on the Barnswallow website here.

As usual at quilt shows I met some lovely people, and bought some much needed items!


This piece of hand embroidery was made by a woman in South Africa as part of Tambani - each piece comes with a card with a photo of the woman that made it.  The pieces represent folk tales. Be sure to check out the link, it is such a great job creation project - you can also buy them from Canada (shipping to the US too) and Europe).


I turned the piece of embroidery into a little wall hanging - 14.5" x 16.5" (the piece of embroidery is 7" x 8"). I machine quilted in the ditch and around the embroidered figures, but thought that hand stitching would look better than machine quilting, and so I used black pearl cotton for the "big stitch" quilting. I also added some beads.


Each piece also comes with the a pamphlet of the folk tale - this one is The Rejected Wife - a story about how a woman and her five sons overcame adversity and triumphed (Alex Anderson reads the story here).

Since I now spend much less time on the computer, I have more time for other things -


I have been making jewelry.


Spinning is going well. This is 100g silk and merino from SweetGeorgia, in the colour way 'Maple'. It is about a sock weight yarn.


I divided the fibre in half, and spun one half with all the colours randomly (the bobbin on the right), and for the other half I spun all the brown, then all the red and finally all the yellow (the bobbin on the left). Now that it is plied, you can still see the long colour change. I plan on making a shawl with this skein.


I am also trying my first pair of toe-up socks (this is some self-stripping yarn I had). While buying the piece of embroidery, I met Clara (from South Africa, a volunteer with Tambani), who was knitting two at a time, toe-up socks and she kindly sent me the link for the pattern she was using (here is a link to part one). I like socks as a "take-along" project, since it is easy knitting.


My sweater is also coming along, I am up to the hip shaping increases. I have to knit about 7" on the body and then the long sleeves.


It is so nice to see the leaves on the trees after six months! Time to get outside and work in the yard.

Have a great day and thanks for stopping by!♥

Friday, April 19, 2013

Week In Review

The week flew by!


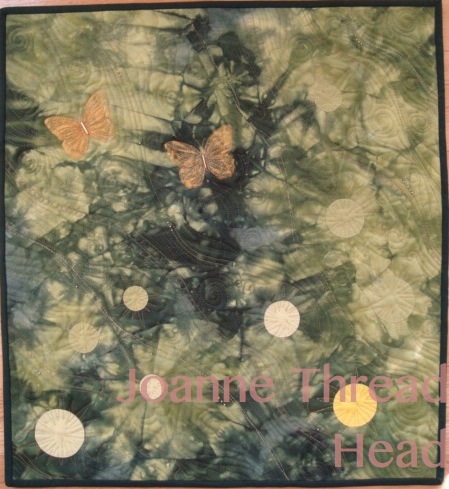
I made a wall hanging from a fat quarter of fabric that I hand dyed (I hated to cut it up, and so used the whole piece). The fabric reminded me of being in the woods on a summer day, and looking up at the sun shining through the leaves. This piece was tray dyed - I packed a piece of dry fabric in a small plastic container and added a different colour dye to each side of the container (in this case yellow mixed with a bit of black on one end, and green with a bit of black on the other end). This is 20" x 22".


I added circles of coordinating hand dyed fabric to represent the spots of sun shining through the leaves, the quilting enhanced that idea.


I stamped some butterfly designs with gold paint.


Also free motion quilted to give the piece a feeling of movement - like the wind through the leaves. I added some beads by hand when all the stitching was complete.


I also did some spinning -  the bottom skein is merino wool for a scarf, and the top is mohair and wool, I was practicing spinning fine for that one -


and I am pleased with how it turned out.


I finished off the practice pieces for the Craftsy Short Rows class - I can see there are lots of possibilities for short rows in knitting that I never knew, like set in sleeves, knit from the top down.

Up next I have a couple of projects I could work on -


I have everything I need to quilt the log cabin quilt or


some beautiful fibres I ordered from SweetGeorgia just arrived! Tough decisions - life is good!!

Other things around here -


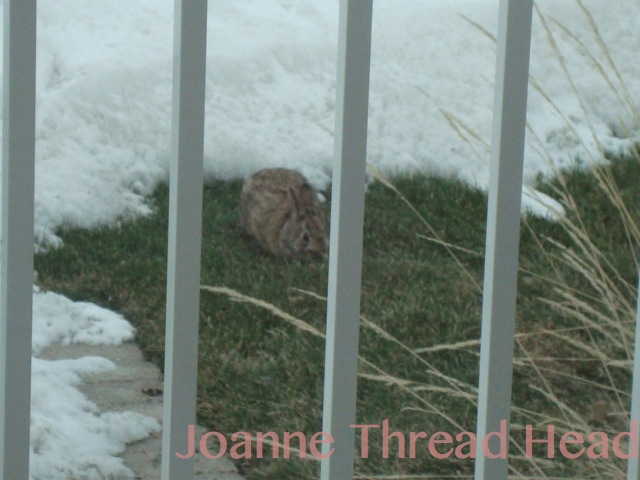
The rabbit seemed pleased to have some grass to eat now that the snow is melting,


and the tulips are coming up (even though they are surrounded by snow, and temperatures are well below normal), so nice to see!


Plus we have a new arrival to the driveway - some other members of my family have a new hobby too - they are super excited!

Have a great day and thanks for stopping by!♥

Monday, January 3, 2011

Drunkard's Path

Happy New Year!!!

I have been having fun sewing Drunkard's Path blocks (cut with my new Baby GO!).


I made a wall hanging - no pattern, but I was inspired by the books "Fat-Quarter Quilting" by Lori Smith and "Hop To It! Appliqued Blocks and Projects" by Edyta Sitar. The DP blocks are 3½" and the applique blocks are 7".
It is 21" x 28", using a mix of Bali fabrics and more traditional fabric. I machine quilted it with Invisafil thread on the top and Aurifil 50wt in the bobbin.

I had lots of fun trying out different quilting patterns for the DP blocks.


The applique blocks are machine appliqued with the freezer paper method (tutorial). The quilting was inspired by the Edyta Sitar book (quilted in the ditch around the applique and then echoed ¼" out, the rest of the block is quilted with random designs).

Have a great day and thanks for stopping by!!♥

Thursday, October 7, 2010

Kimono Block Wall Hanging

I had a friend over today, and we sat and did some embroidery while we visited.

I made another flower for the Romanian point lace table center and she made a Battenburg lace ornament.

Today, (after much thought!) I decided to make a little kimono wall hanging as a door prize for next summers quilt show.


It will hang from a chopstick when it is finished.


The pattern is from Quiltessential Company in Alberta.

Have a great day and thanks for stopping by!! ♥

Saturday, October 2, 2010

Autumn Wall Hanging Finished

I finished quilting and binding this little wall hanging.


It is 16" x 20" (they all are in the "Fat Quarter Quilting" book). I used cotton batting. It is quilted in Invisafil thread, except for the beige background, it is quilted in YLI silk thread (I didn't have the right colour in Invisafil).

centimeters

I free motion quilted little circles for the background (a pattern I have been wanting to try out). It took a long time to do this little quilt - I don't know if I would want to do it on a bigger quilt. They were easy to do because the circles are so small.


I used the walking foot to quilt around all the applique and leaves, then free motion quilted details in. All on my home sewing machine.


In case you are wondering about all the descriptions for every project - it is part of the "Process Pledge".

Have a great day and thanks for stopping by!! ♥

Friday, October 1, 2010

Freezer Paper Applique Tutorial

I finished all the applique on the little autumn wall hanging and wanted to demonstrate this great way to applique.

Tumbling Leaves from "Fat Quarter Quilting" by Lori Smith

This technique is not mine - I have seen it mentioned in a few books. I was intimidated by machine applique (I had appliqued by hand) and had tried various techniques - this is my favorite (and easiest).

This technique uses freezer paper. Trace all the applique patterns onto the paper side of the freezer paper - this will be the right side of the applique shape. Cut out the shape. With a few small spots of glue stick (this is just one I had - and it works), glue the pattern with the shiny (wax) side up onto the back of the fabric. Cut out the fabric with ¼" seam allowance. Clip inside curves.

With the tip of the iron (I don't use steam because I burn my fingers as it is), iron the seam allowance onto the freezer paper. The wax melts and holds the seam in place. This takes a bit of practice to work smooth curves, and not crease the paper.


I didn't end up using this pumpkin - it didn't show up on the border. But I reused the freezer paper pattern.


To make smooth curves on round shapes you can run a small gathering stitch around the edge of the fabric.


Pull the thread and iron the edge down.


I used this technique for the tops of the stems too.


All the pieces are ready to be sewn down.


Pin the applique piece in the correct position (the stem is already stitched down).


I use Glue-Baste-It by Roxanne. It comes with a fancy tip for applying small drops of glue but it needs to be cleaned out every time, so I find it easier to just use a large pin dipped into the bottle to apply small drops.


Apply some small drops around the edge of the applique, on the seam allowance only. The glue dries pretty fast. You could probably omit this step and just use pins. This just makes it more manageable.


Stitch with a fine zig-zag around the applique with an open toe foot, and a #70 needle, with either invisible thread or Invisafil (I tried this for the first time and it worked great). One side of the stitch goes just off the edge of the applique and the other catches the applique.


I use a very fine zig-zag stitch (I have a Husqvarna sewing machine), stitch length of 2 and width of 1.5. Also adjust the tension so that it is tighter (the bobbin thread pulls the upper thread down - it is 3 on my machine). I used a regular neutral thread in the bobbin (beige Aurifil).


When it is all stitched down cut away the backing, leaving a ¼" seam allowance.


Rip away the freezer paper, the tiny zig-zag perforates the paper making this easy. You can use a stitch riper to help tear the paper - but be careful not to catch the thread or fabric. Pull the paper gently so as not to distort anything. Use tweezers to pull out small pieces of paper.


A close-up of the stitching.


This is my sample piece I made to figure out the settings I liked for my machine.

I think this makes a very sturdy applique that would be great for lap/bed quilts etc. I hope you give it a try.

Have a great day and thanks for stopping by!! ♥

Related Posts Plugin for WordPress, Blogger...