Friday, February 3, 2017

Circa 2016 Medallion Quilt

I finished my Circa 2016 Medallion Quilt!


The centre section was the Temecula Quilt Company's quilt-along-quilt for last year.


I added more borders to make is a bed sized quilt. It is 84"x95" (it's on a double bed).


This is quilted on my domestic sewing machine - I used a walking foot to stitch in the ditch around all the borders, and a spring action free motion foot for the rest of the quilting. I used Hobbs Tuscany Wool batting. The quilting was done with Aurifil 50wt thread, and Bottom Line 60wt thread.

It's probably just me but I always wondered how medallion quilts were made - how did quilter get the pieced borders to be the right size? Now I know all about 'Filler Borders', that is the secret to making a medallion quilt - plain fabric fills the space between the different sized pieced borders (a couple of mine are the same background fabric, and a few are a contrasting fabric). There is a bit of simple math involved in calculating the size of the filler borders.


Because the quilt is a rectangle the side filler borders are not the same size as the top/bottom filler borders.

When I was deciding on what borders to add to the quilt I chose to repeat some of the designs from the original centre section -


The Court House Steps blocks are laid out similar to the centre Hour Glass blocks-


The Sawtooth blocks are a repeat of one the centre blocks-


I had always wanted to make a Medallion Quilt, and I learned a lot with this quilt. It was a fun challenge!

I had a few more knitting finishes this week -


A hat and cowl made with yarn from Tanis Fibre Arts. The hat is a free Ravelry Pattern - Lake Reed, and the cowl was made using a cable chart from a Japanese knitting book my son brought me back from Japan.


This year my Mother and I decided to join the Tanis Fiber Arts 2017 Year in Colour Club, and this hat was the January pattern (Heira) and yarn. A quick knit with lovely merino and alpaca bulky yarn - you have to imagine that the leftover ball of yarn is a pom-pom, that I will make when I figure out exactly how to make one.

Luckily I live somewhere with 6 months of winter!


This is what is on my needles now, I am glad to be back knitting with hand spun.

Have a great day and thanks for stopping by!♥︎

Sunday, January 29, 2017

Westering Women BOM


Today I finished sewing the last blocks for the Westering Women BOM from Barbara Brackman, on the Civil War Quilts blog.


This is the November block - Bear's Paw.


This one is the December block - Road to California.


I even finished putting together the quilt top!
I decided that I wanted the quilt to be a bit smaller (to fit a 60" wide plush backing I have), so I used 2" sashing and 5" for the outer border. The quilt top is 54"x68". The blocks are 12".
The patterns for this BOM will only be available online for a few more months, then they will be a paid pattern. The new block of the month (Yankee Diary) started this week on the Civil War Quilts blog, so now I can start that one, but first I need to finish quilting my Medallion quilt.


Lately I have been working on appliqué because yesterday I taught an appliqué class to a local quilt group - I thought every one did so well, I had such a good time and met such wonderful ladies.

Thanks for stopping by and have a great day!

Friday, January 27, 2017

Another Table Mat!

This week I made a table mat, and thought I would share the process in case some one wanted to make something similar.


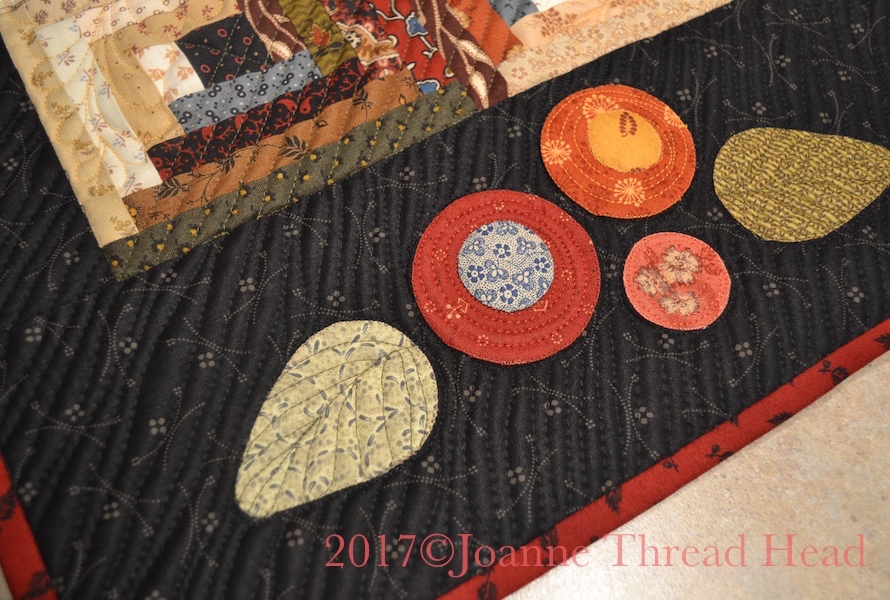
This has pieced Log Cabin blocks and simple appliqué. 


It is about 14"x25" - the centre is 10"x15" using six 5" blocks.


The 5" Log Cabins are made up of 1" strips and are a great way to use up small pieces of fabric (I got out my bowl of leftover pieces of fabric).


To make things easier for myself I place masking tape labels on the the cutting table to make sure I cut out all the pieces I need.

Log cabin blocks are my favourite to make (I love the cutting, the piecing, the different ways they can be laid out....).
I am slowly learning that they look best with a strong contrast in light and dark, also with a good mix of print sizes (scale of the print), with some odd 'zingers' of fabric thrown in for fun (someone wise once told me that if I didn't like a fabric it was because I hadn't cut it into small enough pieces - this is the perfect time to use odd fabric).

These blocks have 1/2" finished 'Logs' with 1" finished centres. Cut the strips parallel to the selvage (if you are using scraps you can snap the piece and it should make a slight 'ping' noise and have little/no stretch). Some people like to make Log Cabins without pre-cutting all the pieces, but I find it easier to have them all pre-cut.

For each 5" Log Cabin Block Cut -

1+1/2 square for the centre (all mine are the same fabric).
The logs are made with 1" cut strips, cut to the following lengths -
           1+1/2" light only, for the following both light and dark are needed - 2" , 2+1/2", 3",
           3+1/2", 4", 4+1/2", 5", and from the dark only 5+1/2".

Cut out 6 of each size for the 6 blocks.

If you wanted to have the centres cut to 1" like the Logs, then decrease all the strip lengths by 1/2" and the finished block will measure 4+1/2".


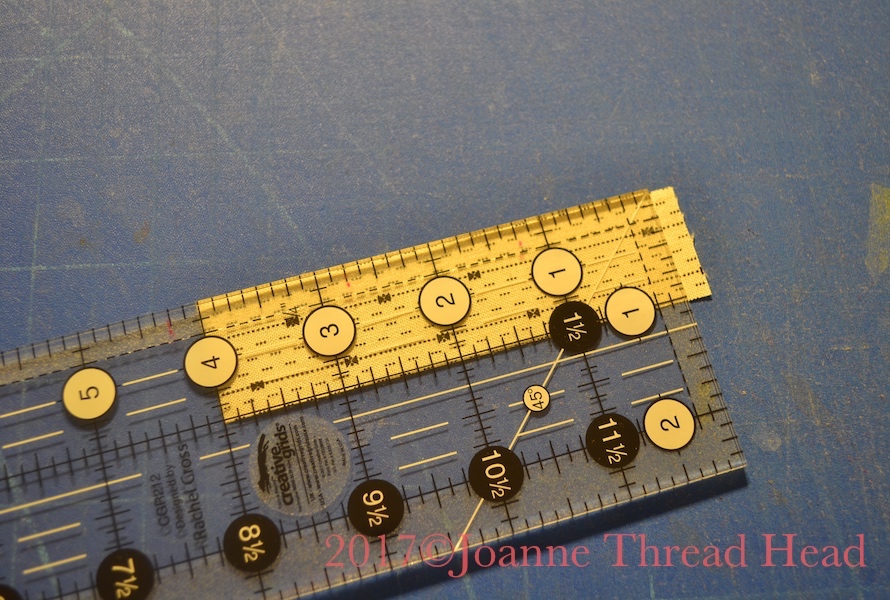
I like this Creative Grids ruler for cutting out the Logs.


The pieces will be chain pieced in this order.


Chain piecing in progress.


When I was cutting out the fabric I tried to only use the same fabric just once or twice, because there were only 6 blocks I laid out the strips I was going to use before sewing to make sure one block didn't use the same fabric twice.


Once all the blocks were finished I sewed them together in a Fields and Furrows layout - there are other options for layouts, especially if you have more blocks.

I wanted a long and narrow table mat for my coffee table so added uneven borders -


2+1/2' and 5+1/2" borders for mine,


It would be great with even borders too.

For the appliqué I used my favourite invisible machine appliqué technique - link to my tutorial.


I opted for simple circle appliqué pieces (this is a handy circle template from an office supply store), traced straight on to some freezer paper. I used 2+1/4", 2" and 1+1/4" circles with a couple smaller ones for the flower centres.


For the leaves I used a circle (1+3/4") with a V added to shape it into a leaf.


All the leaves were the same size, so I only drew out one, stapled it to a few layers of freezer  paper and cut them all out together -


This worked the same for the circles.


To make things easier when pressing the fabric to the freezer paper I basted around the shapes with a small running stitch to gather the seam allowance evenly to the shape.


 The appliqué pieces all ready for stitching.


Now comes the fun part of deciding how all the pieces will go.


I chose a simple layout in the large side border.


Stitched down the first layer,


cut the backing and removed the paper,


 before adding the next layer of pieces.


For the appliqué stitching I used Invisafil by Wonderfil thread - a 100wt thread that blends beautifully,


and really becomes invisible.


I have made quite a few quilted items with this appliqué technique, and am amazed how well it stands up to lots of use and washing - the fabric has shown signs of wear with no change to the appliqué stitching.


I used Aurifil 50wt thread top and bobbin for the free motion quilting. Parallel lines in the dark sections of the blocks, and feathers in the light sections of the blocks. A chose a wavy 'parallel' line for the borders. Embellished the leaves with 'veins' and stitched spirals in the flowers. Since this is a table mat I like a lot of stitching to make sure that is flat so mugs and glasses aren't tippy on it. I used 2 layers of batting (this time one silk and one cotton, just because I had the right size leftover pieces).


More Log Cabins on the couch, well one is a Courthouse Steps, but close enough.

If you decide to make something similar please send me a picture so I can share it here.


This is my Mother's version - no appliqué and simple walking foot quilting.

Thanks for stopping by and have a great day!

Tuesday, December 13, 2016

Hexagon Shaped Mug Rug Tutorial

I just finished a hexagonal shaped mug rug for Christmas, and thought I would show how I made the shape.


I can't give the pattern for the appliqué since I was inspired by a beautiful table runner I saw on Pinterest (here is the link). The original reminds me of Drunkard's Path blocks. I made mine using Invisible Machine Appliqué (link to my tutorial) with a simple partial circle for the snowman, circle-ish shapes for the eyes, and a carrot shaped nose. I embroidered a mouth with all 6 strands of embroidery cotton, using a stem stitch. My plan is to design some hexagon mug rugs in the future and wanted to have this tutorial on my blog for reference.

I like hexagon mug rugs because they are a bit different, and seem easier than making a circle mug rug (no bias binding!).

I am lucky enough to have this great set my Dad had at Military College.
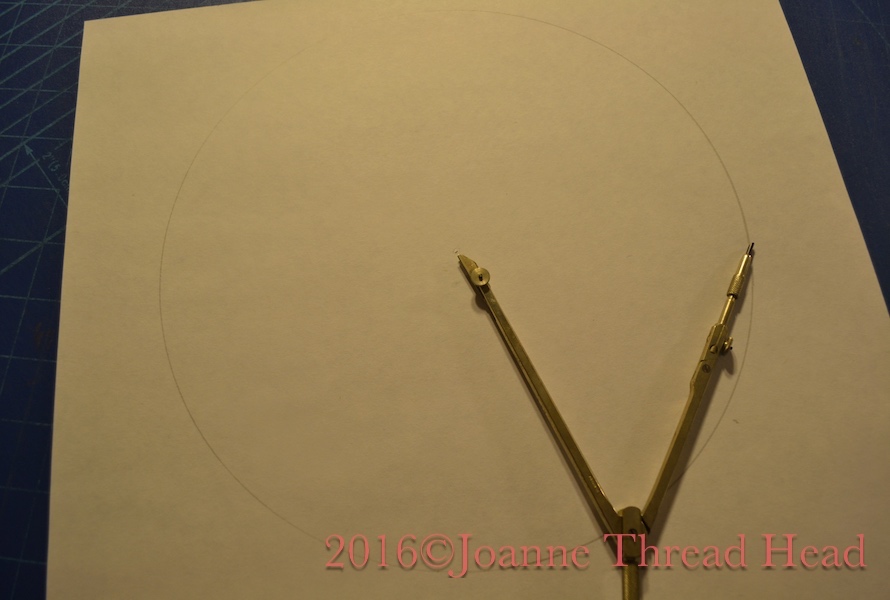
For the hexagon template I started with a large piece of paper, and a compass.


I drew a circle, mine has a radius of about 5" (the diameter of the circle will end up being the point to point measurement on the template).


Mark a point on the circle, and keeping the compass at the radius measurement start at the first mark and mark that distance on the circle, repeat until there are 6 equally distant marks on the circle (this is nothing new and I hope it makes sense).


Join the marks with straight lines,


to create a hexagon.


Cut it out (I use an old rotary cutter that I keep for paper), and there is your hexagonal template.


I had cut the appliqué piece slightly larger than then template and after machine quilting I trimmed it using the template.
I used 2 layers of silk batting for this mug rug - it is nice and flat, and I had scraps the right size. All the free motion machine quilting was done with regular sewing cotton.


For the binding I used single layer, 1+1/2" wide strips (this makes the little mug rug lay flatter than a folded, double layer binding). With a walking foot, I stitched the binding on (needle moved over 1/4" from the edge), just like a quilt with regular 90º corners - stitching along one side until 1/4" from the next side, turning the work so the foot is parallel to the new side, backstitching to the edge, lifting the foot, folding the binding to fold, and stitching down the new side.


I didn't quite know what to do with this angle the first time I had to bind one, but this seems to work for me.


The mug rug binding all ready to be stitched down on the back by hand.


I have a chair with a little round table attached and I think a hexagon is a perfect shape for it (this mug rug is about 10" point to point and about 8.5" side to side). The machine quilting is very dense because I wanted the mug rug to be very flat. I quilted double loops on the snowman, micro-stipples in the background and parallel lines on the nose.

The Partridges are back for the winter - just a flock of 3 so far.
Have a great day and thanks for stopping by!
Related Posts Plugin for WordPress, Blogger...