Pages

Wednesday, October 31, 2012

Keeping Up

I was inspired by Raewyn (Love to Stitch) to get caught up, and keep up before the end of the month.

I finished the October Small Quilt from Kathleen Tracy's (A Sentimental Quilter) small quilt group. This one is from Kathleen Tracy's Civil War Sewing Circle book.


It is supposed to have 12 blocks, but I only made 6. It is about 12" x 15".


I added lots of quilting.

I stitched in the ditch first - ESS

I marked a 1/2" grid with a ruler and a Hera marker,


and quilted Cathedral Windows. I love how the hexagon flowers look like they are trapunto. I used a layer of cotton batting with a half layer of wool batting on top.


I also used this stencil (marked with quilt pounce),
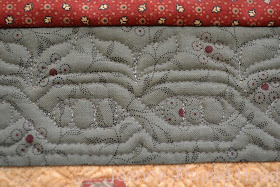
looks like DNA strands

but added some extra details - Cindy Needham style!
Since the Craftsy class it has been interesting to think of different ways to use the few stencils that I have.


In the corners I added a feather swirl. You can see that the binding was already sewn on, but not stitched to the back yet (I don't usually cut the backing and batting to size before I bind a quilt, and so there was space to hold the quilt when quilting). Adding the binding before quilting makes sure that the design fills the area, and won't get cut off.


I used a white board to figure out how the design was going to work.


The hexagon flowers were quilted with a feather wreath. They are such tiny hexagons (3" across) that I left the centres puffy, with no quilting.
Graph paper to make hexagons can be found here, the link is from the book, and a great site to bookmark.


I also finished the September Small Quilt of the Month -  This quilt is free on Kathleen Tracy's web site. It is 21" square. Just cotton batting in this one, I wanted the crinkled look.
I like the fabric I used, but I realize now that some of them are too close in colour value, and so the quilt looks odd. Oh well, live and learn!


I thought this quilt would be a good opportunity to try out some different quilting designs. I quilted designs that I had never quilted before. I thought that the shapes in the big squares looked like sea weed. Sometimes I end up with designs that I can use again, and sometimes not, but it is all fun. I did FMQ a quote from Diane Gaudynski around the border - Keep quilting, your work gets better everyday, just to try something else new.
I love quilting small quilts, it is the perfect time to try different designs, threads etc.

It is so nice to be all caught up! I even wrote, and scheduled to post, the next 2 quilt along block posts this week!

All the quilting on the above two quilts was done with 100Wt Invisafil thread
100Wt thread is so wonderful to quilt with. You don't get thread build up when backtracking, and it blends right into the fabric. 


One 2500m (2734yds) cone of Invisafil cost me $12, and will last for a very long time.


This 200m (219yds) spool of 100Wt silk thread has a price tag of $6.95! (I bought it much cheaper as part of a sale pack, and was surprised to see the price.) This spool will not do too much quilting.
I don't really see any difference when quilting with the polyester or the silk. To me, it makes much more sense to have fun doing lots of quilting with the inexpensive thread. 

Tip - If you don't like the look of your quilting, try 100Wt thread, it is surprising how much better your quilting can look with a really fine thread.

I have seen a bit of "talk" in blogland about how long people have been free motion quilting. I have been FMQ for about 7 years. I started with just meandering (and using a walking foot for straight line quilting - all my quilts were quilted the same way or else hand quilted).

My first machine quilted piece
You can't see the meander in the border - the thread matched perfectly to hide the quilting.

I discovered quilting blogs about 4 years ago, and I knew it was time to try something new!
The next photo is of the first quilt I designed with EQ6. It is also the first time I tried quilting something different - feathered wreathes!! I had to start with the hardest design.


They are pretty sad! But I proudly display the quilt to show how far I have come. I quilted this quilt exactly 4 years ago. You can see the pieced blocks have no quilting (they are only small blocks and there is quilting in the ditch around all the blocks), after the odd wreathes I was done free motion quilting this quilt.
Soon after I discovered Diane Gaudynski's web site, blog and books, and with lots of practice, the look of my quilting really changed. Thanks Diane!!I owe it all to you! 


Thank-you to every one that left such kind comments on my latest piece. Your words of encouragement mean so much to me!

Happy Halloween
 Have a great day and thanks for stopping by!

Tuesday, October 30, 2012

Block 7 THQA 2012

For this week I chose a Twelve Triangles block.


For this 7" block you will need - 


Print A (mine is the green dots) -

                     2 - 4+3/8" squares, cut in half on the diagonal

Print B (mine is the red print) - 

                     1 - 4+3/4" square, cut in to 4 on the diagonals

Print C (mine is the yellow "tree" print) - 

                      2 - 2+5/8" squares, cut in half on the diagonal (my squares are cut on the 
                                       opposite diagonals to keep the pattern lined up - just me)

Print D (mine is the orange dots) - 
                       1 - 3" square (this is the centre)

All the same weekly rules apply. Remember to use scant 1/4" seams (my blocks came out smaller than my other blocks, but that is probably due to the fact that I lost my 1/4" sewing foot and had to buy a new one!)


No quick tricks this week! All the twelve triangles are sewn around the centre Print D square. I did trim the triangle points with a point trimmer.


Start with the Print C triangles.


I sewed the opposite triangles on first, and pressed the seam allowances away from the centre,


then added the other triangles, and press the seam allowances away from the centre,


to make a square.

Keep adding all the triangles around (you get the idea), just be careful not to stretch the triangles on the bias.

Print B is next.


Lastly, the Print A triangles -


 Trim the block to 7+1/2".


This version was made the same way.


 For this version I used the same fabric for B and D.


 All three (this is closer to the actual colour).


I laid the blocks out with the fabric I have for the setting triangles and border. I still haven't decided which fabric I will use, might even alternate the zig-zag rows.

Keep posting your block pictures on Flickr - they are lovely to see all together.

Thanks for sewing along and have a great day!

Saturday, October 27, 2012

Bump-Bump Feathers

Recently I have realized that my favourite feathers to quilt are Bump-Bump feathers, so I thought I should add a tutorial here.


I find that bump-bump feathers are easier to quilt than traditional feathers, and that they are more organic in appearance, which I seem to really like now. Traditional feathers tend to be more symmetrical and even.

This is just how I quilt the feathers. Feathers are like signatures and everyones will be different. This is also how I like to quilt - everyone is different and will figure out what works for them.

I have talked about free motion quilting feathers on a domestic sewing machine before (here is the link for my first feather tutorial with video), and I went more into depth about FMQ. For this tutorial and video I assume that you already have seen the other post.


This is my wonderful sewing machine - Sapphire 870 Quilt by Husqvarna (in its lovely new cabinet - the best investment for FMQ).


I use a spring action quilting foot (and set my machine to the Spring Action setting in the menu), there is a single hole throat plate on my machine (that has really helped with tension problems that I had with quilting), and the feed dogs are up (I find that it is easier to control the movement of the fabric this way). I don't have a slider or any other fancy gadgets other than quilting gloves (clean gardening gloves or rubber gloves work in a pinch).

Here is a video (this one works now) of me quilting Bump-Bump feathers (I have already pulled up the bobbin thread and taken a few anchoring stitches) -


You will notice that I quilt slowly.

the completed bump-bump feather

I used a 50Wt Aurifil thread, in a contrasting colour, so that it would show well on the video, usually I use thread that matches the fabric, and I prefer a finer thread (100WT) so that the back tracking is less visible.

Concentrate on getting nice smooth shapes, and worry about stitch length as your quilting improves. Short stitches are better than stitches that are too long (long stitches make corners in curves). It is important to listen to the sound of your machine, without really thinking you will know how fast to move your hands (all that sewing pays off here).

I thought I should add some written explanations for quilting bump-bump feathers too -


I start from the bottom (and it is easiest for me to work towards myself, but we are supposed to be able to free motion quilt in every direction). Make a nice shape at the tip of the feather, and backtrack down the stem.


Stitch a complete tear drop lobe at the base of the stem. This can be quite small. Make sure that the tear drop comes off at a nice low angle (less than 45° to the stem).


Come out at a nice low angle again, between the stem and the first lobe,


stitch around to touch the previous lobe,


stitch back over the top of the lobe you just made,


and then bounce back out to form the next lobe, coming back around to the stem.


This is how the Bump-Bump feather gets its name.


Keep working up the side.


When you get close to the tip, decide if one more lobe will fit or if the space can be divided in half to fit two more bump-bump lobes.

Travel back down the stem and complete the other side.


If you want to make a split feather, before traveling all the way back down, add another stem from the centre (it is at a low angle too).


To work the lobes you need to start with a tear drop shape between the two stems.


Create the bump-bump lobes the same way as above, making sure when you work the lobes on the first side that you leave enough space for the lobes on the other side.


A close up of a split feather from my Vase and Feathers sample.


Tight inside curves are easier to quilt with organic bump-bump feathers, because you can make small lobes, with bigger ones curving around.

some tight curves on my Vase and Feathers sample

Another tight curve from my 72 Shades of Red table mat.


Since the feather border went completely around this quilt, I stitched the centre stem first, and when I was back to the beginning I started the lobes (no back tracking).


The feathers in my Bali Baby Jane border are between corner blocks, and so back tracking was involved. On this feather I didn't quilt lobes along the whole stem, one side is missing a few lobes near the seam (click on the photo to enlarge).

Here is a variation for the stem -


Instead of back tracking directly down the stem, leave open areas.


After completing the bump-bump lobes on the first side, travel down the stem creating pearls in the open spaces (the pearls are like figure-8's, but you complete one full circle before traveling to the next and completing it in the opposite direction - I hope that makes sense to you).


Here is a feather with pearls down the centre (this is from my October Free Motion Quilting Challenge sample quilt). I also added some extra embellishments to this feather.

Thanks for stopping by and have a great day!