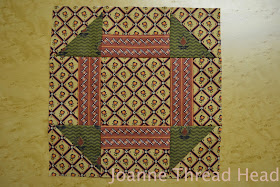
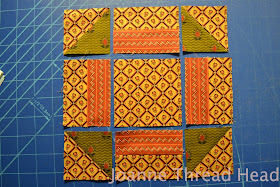
Another simple block this week - the Churn Dash.
For one 7" block you will need -
Print A (mine is the gold print) -
1 - 3+1/2" square (this is the centre of the block)
4 - 3+1/2" x 1+1/2" rectangles (for the outer sides of the block)
2 - 3" squares (for the half square triangles - HST)
NB - the EQ measurements are actually 2+7/8" squares,
but if you are making the HST like
I show, 3" is easier to cut.
Print B (mine is red) -
4 - 3+1/2" x 1+1/2" rectangles
Print C (mine is green) -
2 - 3" squares (for the half square triangles - HST)
Sorry - these pictures really don't do the beautiful Jo Morton fabric justice.
Like last week's block - for best results, measure accurately, use a scant 1/4" seam allowance when sewing, press the seams to one side, and trim the individual units before piecing the block together. As the weeks go on I won't keep mentioning this.
Sew the 3+1/2" x 1+1/2" rectangles together as shown.
These four units should measure 2+1/2" x 3+1/2".
Using the 3" squares, make the Half Square Triangles (detailed instructions can be found here).
I mentioned last week that I was "stepping out of my box" for this quilt - normally I steer clear of stripes and directional prints, well this fat quarter pack is full of them! I bought it because I liked the colours. If it is important to you that the stripes/directional prints match over a block, here is what to do -
For the HST, when you trace the line on the back of the fabric, have the print going at right angles (90°) to each other for the two squares (you can see the direction of the stripes and the direction of the drawn line in the above photo). This also works when you are making Fast Flying Geese. Because I also had a directional print for the contrasting squares, I had to pay attention to how I placed those squares too. I also paid attention to how I cut the rectangles of print A to make sure the print was going in the right direction for all the sides. I know, it is probably just me!
Anyway, back to sewing!
Trim these four units to 2+1/2" squares - once again this is important because we cut the print squares bigger than we needed.
Here are the four HST units.
All the units are ready to be sewn together (like a regular nine-patch).
Sew the three units into rows,
pressing the seam allowances in opposite directions (this helps with matching the seams, they will "lock" together. I also pin the seams). You can use an iron or just finger press.
Sew the rows together.
Trim the block to 7+1/2" (it will be 7" when the quilt is finished).
Here are all three of my blocks.
The fabric you use can change the look of a block.
I used a different fabric for the centre square for this one.
For this one I used three different fabrics for the "Print A" squares and rectangles.
All 6 of my blocks so far (better colour in the natural light).
Please email me if you have any questions or concerns (about the blocks or in life!), I'll do my best to help.
I have started a THQA 2012 Flickr Group for those who want to post pictures of their blocks. Anyone can join (I think you just need a Yahoo account, which is easy to set up).
Lots of people are printing the instructions, and I hope they have noticed the little printer symbol at the bottom of each post. If you click on it, it opens up a new page, and you can click on photos and text to remove it (there is an "undo" button at the top if something you wanted disappears) so that you don't have to print out the whole thing - saves ink and paper. This is courtesy of Print Friendly and works for any web page - thanks Print Friendly!
Thanks for quilting along with me, and a huge thank-you for all the kind comments and words of encouragement! It makes it so much fun for me. Have a great day!❤


