Sunday, October 31, 2010

Projects Update

Happy Halloween!

stained glass pumpkin I made a few years ago

I have been working on different things this weekend.

I started sewing together the blocks for the arrowhead quilt.

This is the layout I chose.

I have been doing a bit of work on the Romanian Point Lace table center,

and still working on the braid that will surround the table center, a centimeter at a time - I need almost 2m!

Still doing tatting - this one doesn't take much concentration, and so is great in the evening watching TV (the thread looks variegated in the picture, but it is just plain beige).

I also pulled out this cross stitch I started a few years ago - maybe I will finish it for this Christmas?! It is in the basket in the picture for my blog header. This one is hard on my eyes and so has been taking a while. Yesterday I finished the beard and did everything under it!! Hours to do two square inches - I'll be lucky to finish it for Christmas!!

It is a kit by Lorri Birmingham.

Have a great day and thanks for stopping by!!

Thursday, October 28, 2010

Quilting Practice

I having been working on lesson #2 of the Quilt Whisperer course that I am taking.

This weeks lesson is about different quilting designs. I have been practicing some different designs that Carla demonstrated. It is nice to be able to add new designs to my repertoire!

I quilted the second leftover log cabin block as practice.


I really liked Carla's oak leaf design and tried it out all over (E2E - edge-to-edge - another term I learned in the course!).

Have a great day and thanks for stopping by!!

Wednesday, October 27, 2010

Block #4

I was inspired by The Quilt Index for this weeks block.

For this 9" block you will need -

Background (I chose dark beige) -

4 - 2+3/8" squares (for the half square triangles - HST)
4 - 2"x3½" rectangles
1 - 4+3/16" square - cut in quarters diagonally (see above photo)

Print A (mine is blue) -

4 - 2+3/8" squares (for the half square triangles - HST)
2 - 3+7/8" squares - cut in half diagonally (see above photo)

Print B (gold) -

4 - 2" squares

Print C (red) -

1 - 3½" square


Make 8 HST's with the 2+3/8" squares (4 background and 4 print A). Draw a diagonal line, sew ¼" on either side and cut on the line..... (hopefully you have done this enough so that I don't have to write HST instructions every time). Trim these squares to 2".

I have chosen to press the seams open for this block. Anita Grossman Solomon recommends this and I tried it with the Arrowhead block and was so pleased with how flat the block was. I can't say that I would open the seams every time - but I tried it for this one.

Make the center by sewing the 4 background triangles around the print C square.

I used one of the handy-dandy point trimmers to make lining up the triangles easier - but it is not necessary.

Sew the print A triangles around. This center square should be 6½".

Sew the HST on to the ends of the background rectangles - there will be 4 of these units. They should measure 2"x 6½".

Now you are ready to sew the block together -


Print B are the corner blocks.

Trim the block to 9½".


I made two blocks again.

Thanks for dropping by and have a great day!!

Tuesday, October 26, 2010

Bloggers are the Greatest!

Thanks to everyone who made suggestions on the layout of the Arrowhead quilt!
My favorite layout was the lighter in the middle one -

Some people suggested I try a random layout, so here it is -

I think my favorite is still the lighter in the middle.
One of the best suggestions I received was to think of how I was going to quilt it! (Thanks Cheryl!) What a great concept and one I never think of!! I think I could try quilting something different in the lighter section.

Tomorrow I will post Block #4 of the Quilt Along and I need to work on the Quilt Whisperer course that I am taking. Lesson #2 is full of quilt design ideas for us to try out - so I have some homework to do (my children find this hilarious!!).

Have a great day and thanks for stopping by!!

Monday, October 25, 2010

Decisions, Decisions!

I finished putting all the Arrowhead blocks together, now I have to decide how they will go together. I tried out a few layouts -

All the lights in the center

The lights running through the middle

The lights at the top

I even tried the pictures in black and white to see if that would help -


What did we do before digital cameras??!

I think it will take me longer to decide on a layout, than the time it took me to make the blocks!!

Have a great day and thanks for stopping by!!

Sunday, October 24, 2010

Good Things Come.....

I have had this collections of Figgy Pudding by Basic Grey for over a year waiting for the right pattern to come along - and yesterday I found it!!


I saw the pattern on Happy Cottage Quilter. She has all the instructions.

After I made a couple of sample blocks yesterday, I cut all the squares I would need to make a (46" x 65") lap quilt (35 blocks altogether, so 70 squares of fabric).

Sewing two squares together.

Some squares cut and ready for sewing into blocks.

Half of the blocks made.

The pattern is called "Anita's Arrowhead" by Anita Grossman Solomon (be sure to check out her blog, lots of ideas, and she also has a great tip on how to enlarge any page on the internet!! - Very useful!).
The block is so simple to make!! The design of it is ingenious!!

If you want to try the pattern out, the block would work in the Thread Head Quilt Along quilt. I also think you could convert the pattern to use a layer cake, keeping the squares 10". Hmmm... Lots of possibilities!!

Have a great day and thanks for stopping by!!

Friday, October 22, 2010

Alternating Blocks Update

I finished sewing the alternating blocks for the quilt along quilt that I had cut out.

Cutting the strips the width of the fabric (42" wide) makes 12 blocks.

The beautiful full moon this morning.

Have a great day and thanks for stopping by!!

Thursday, October 21, 2010

Quilt Whisperer Course

I started a Quilt Whisperer course this week offered by Carla Barrett. The course is in deciding what to quilt on a quilt. All kinds of things have been covered in the first lesson. One thing she mentioned was using 2 layers of batting (she suggests an extra layer of polyester batting) when machine quilting, so I thought I would give it a try.

I had a couple of trial log cabin blocks (11") and made a potholder with one of them. I used two layers of batting (I used batting with the foil and a layer of polyester - not something I have ever machine quilted with). I also tried a different style (for me) of feathers - needs more practice. I am hoping with the course that I will learn to step out of my comfort zone!

If you want some inspiration for quilting, visit Carla's quilting gallery. She is a long arm quilter - a stand up quilter (I am a sit down quilter - I learned that in the course!!).

I took a break from the quilt along, but I found some great pictures on blogs today for ideas!

This one is from Sew Karen-ly Created (a wonderful blog!), the quilt uses similar Alabama Variation blocks that I have chosen for the quilt along quilt, but the blocks are set on point.

This one is from Quilts in the Barn. When I was deciding on the design of the quilt along quilt I had a few ideas in mind, and one with Flying Geese sashing was one of my favorites. This design could be made with Fast Flying Geese with a finished size of 1½" x 3" (using a large 4+3/4" square and 4 little 2+3/8" squares).

Have a great day and thanks for stopping by!!

Wednesday, October 20, 2010

Block #3

EQ7 calls this block "Martha Washington's Star", it is a variation of a variable star. "Variable Star" is one of my favorite block patterns, and I know a few variations are going to show up in the quilt along!


For this block you will need -


For the fast flying geese -
1 - 5+3/4" square background
4 - 3+1/8" squares print A

For the center windmill -
1 - 3+7/16" squares print B
1 - 3+7/16" squares print C
2 - 3+1/8" squares print B

Corner squares -
4 - 2+3/4" squares background

To make the "Fast Flying Geese" draw a diagonal line on the wrong side of each small print A squares, and lay 2 squares on the large background square -

Sew ¼" on either side of the line, cut apart and press the small triangles back.

Place the remaining small triangles and sew ¼" on either side of the line.

Cut apart and press. Trim the flying geese to a 2+3/4" x 5" unfinished size.
These are quick "Fast Flying Geese" instructions - I have posted more detailed instructions on a previous post and there are online instructions available.

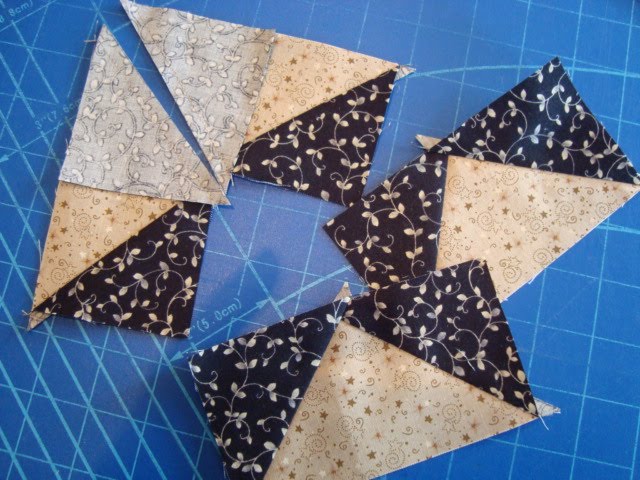
Making the windmill center -

Layer the two 3+7/16" print B and C squares wrong sides together. Draw a diagonal line and sew ¼" on either side of the line. Cut apart and press the seam to print C.


Lay the two smaller squares on the half-square triangles. Draw a diagonal line and sew ¼" on either side of the line.

Cut apart and press the seam. Trim the squares to 2+3/4".

Sew the windmill together.

Unpick the last few stitches of the previous seams and

press the seams in alternating directions to reduce the bulk where all the points meet.

Trim the windmill section to a 5" square. Sew all the pieces together.

Press and trim to 9½" square. Finished!

Along with the second block.

I probably won't post another block until next week, I'll work on some other projects!

I hope there are no mistakes - blogger is disabling image uploads and I wanted to get this finished!

*Update* - Oct 21 - I had wanted to add this yesterday but ran out of time!

Here is a variation for block #3 (this is from a baby quilt that I made for my youngest child). All the squares are the same measurements, but the two 3+7/16" squares of prints B + C need to be cut (on the diagonal) into 4 triangles before sewing together. The two 3+1/8" squares need to be made with a print D, and cut (on the diagonal) into 2 triangles. Lay all the pieces for the windmill section out in the correct pattern before sewing.
Karen has a great idea of changing fabric placement for the second one of each block design.

Have a great day and thanks for stopping by!!
Related Posts Plugin for WordPress, Blogger...